Siovue Video Converter is an all-in-one audio and video tool that integrates video conversion, video compression, video download, and DVD conversion. It supports processing almost all audio and video formats. With advanced algorithms, it can quickly and efficiently convert and compress audio and video files with superb quality. Additionally, it can download audio, video, and subtitles from over 800 websites, and convert DVDs to video and audio files while preserving all audio and subtitle streams. Below is an introduction to using Siovue Video Converter.
Part 1: Download and Installation
1. Download: You can download the installer from the official Siovue Video Converter website.
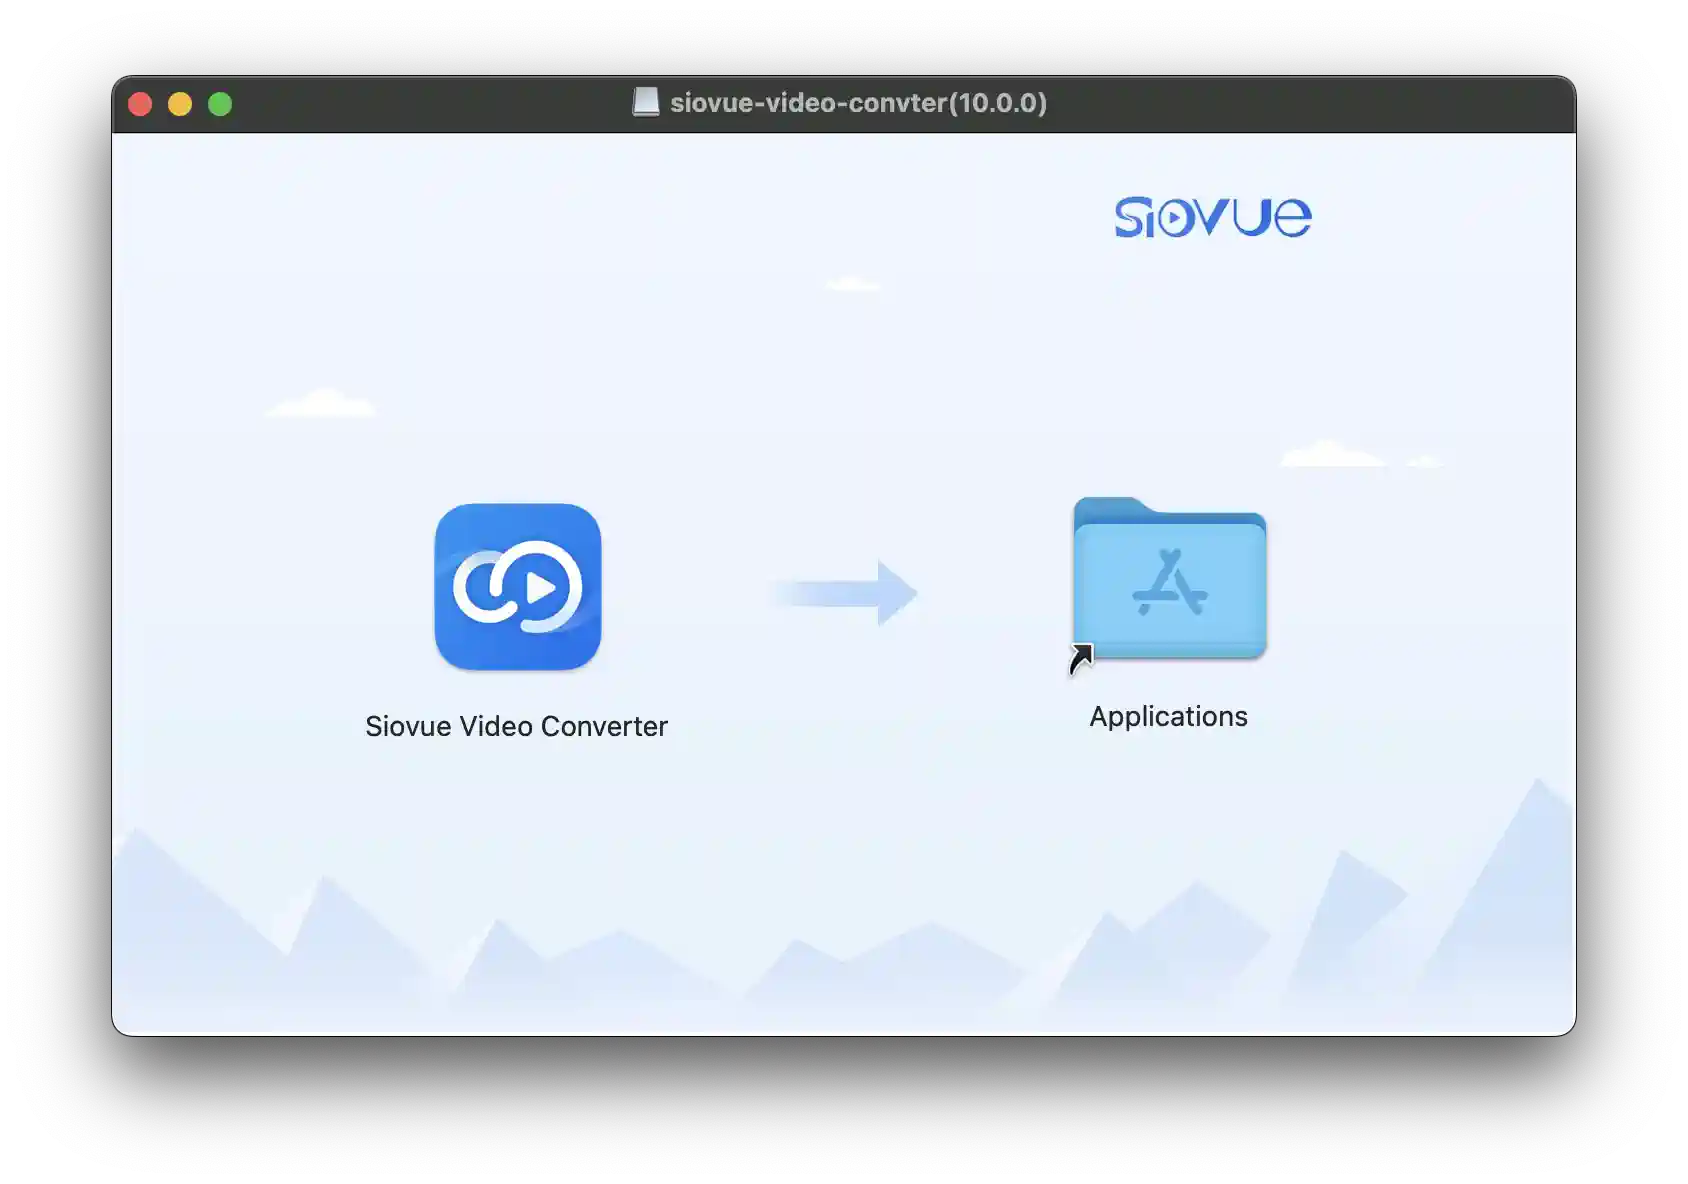
2. Installation: Locate and double-click the DMG installer package to open it. In the opened DMG package window, drag the Siovue Video Converter icon to the Applications folder. A copy progress will appear; wait for it to complete. Once the copying is finished, the installation is complete.
3. Open: Find Siovue Video Converter in Launchpad and click to open Siovue Video Converter.
Part 2: Video Conversion
Video format conversion is necessary to ensure videos can be played on different devices or platforms. Various devices or platforms may support different video formats, encodings, and resolutions, so it is essential to convert videos to formats that meet the specific requirements of these devices or platforms.
What audio and video formats does Apple support?
Audio:
- AAC (Advanced Audio Codec): A high-efficiency lossy audio encoding format.
- ALAC (Apple Lossless Audio Codec): Apple’s lossless audio encoding format.
- MP3 (MPEG Audio Layer III): A common lossy audio format.
- AIFF (Audio Interchange File Format): Apple’s lossless audio format.
- MIDI (Musical Instrument Digital Interface): Used for communication between digital instruments and computers.
Video:
- MP4 (MPEG-4 Part 14): A commonly used multimedia container format that supports H.264 and H.265 encoding.
- MOV (QuickTime File Format): Apple’s multimedia container format that supports various encoding formats.
- M4V: Similar to MP4, but often includes Apple’s FairPlay DRM protection.
- MPEG (Moving Picture Experts Group): Includes MPEG-1 and MPEG-2.
- MPEG-4: Commonly used in MP4 and MOV container formats.
- H.264 (AVC, Advanced Video Coding): A commonly used video encoding format.
- H.265 (HEVC, High Efficiency Video Coding): A next-generation video encoding format.
- DV (Digital Video): Used for digital video cameras.
How to Convert Video or Audio to Other Formats?
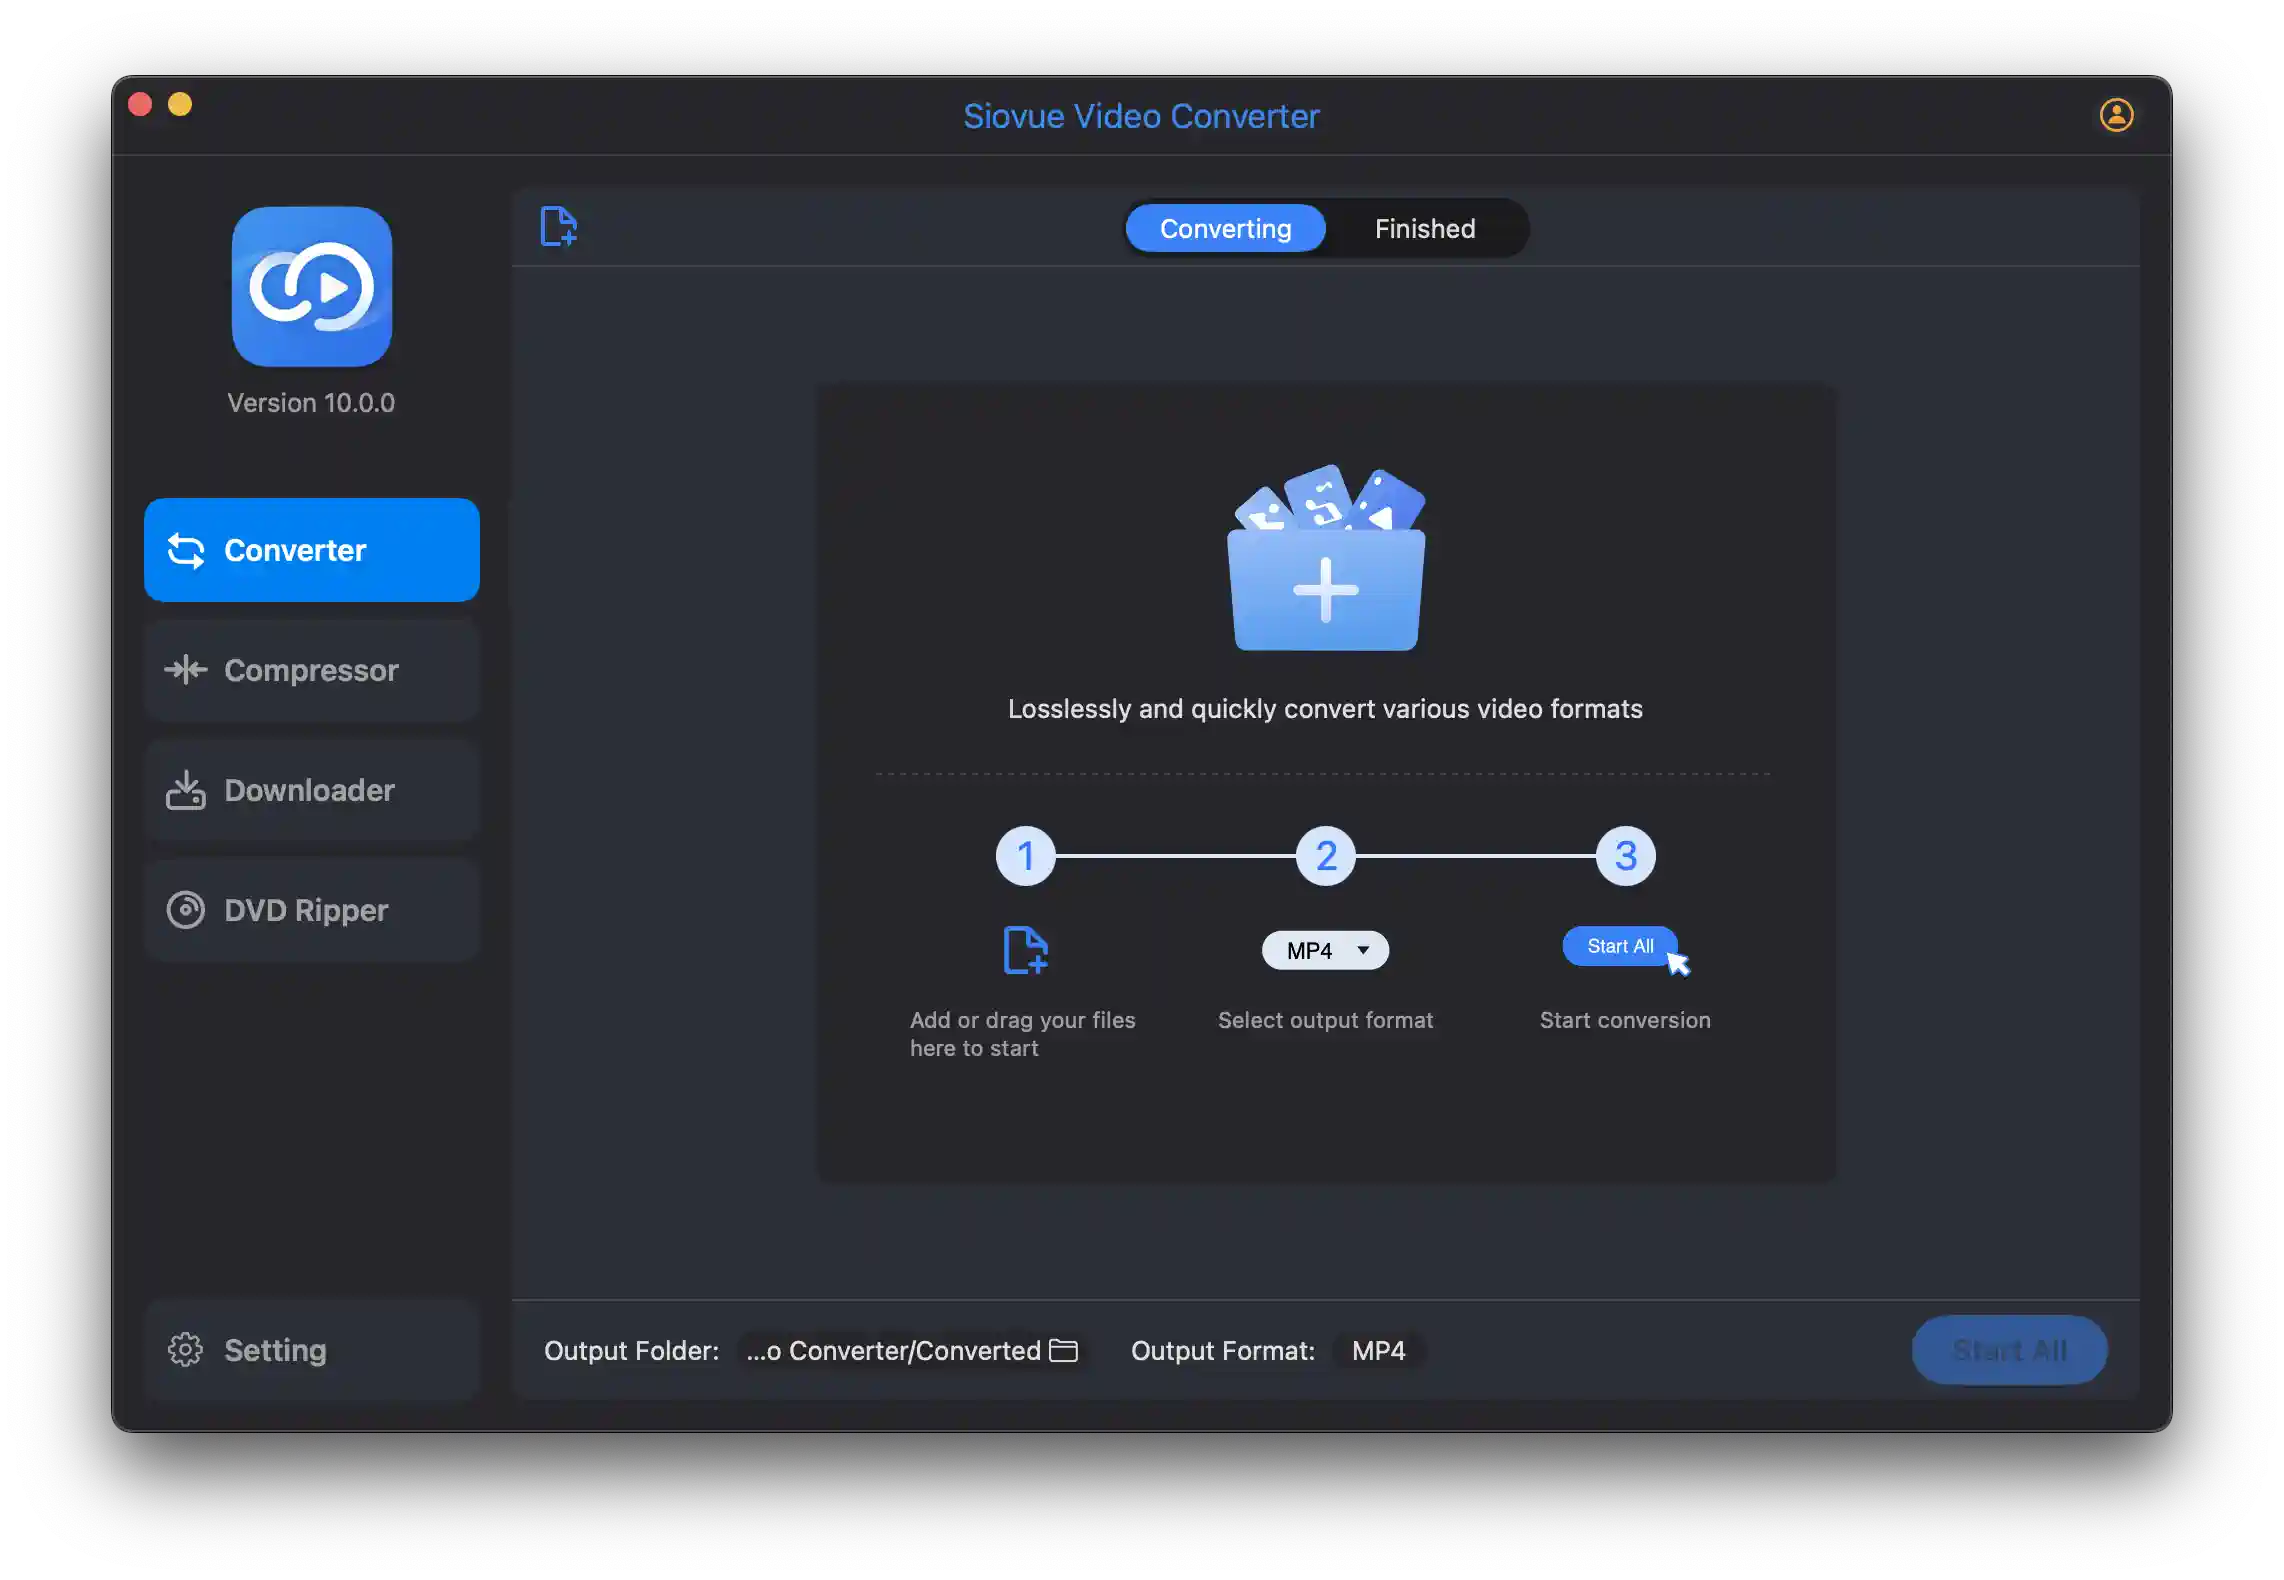
Step 1: Select Converter in the left column of the main interface.
Step 2: Add audio or video files.
- Drag and Drop Import: Drag the files into the Converter content area.
- Finder Import: Click the
 button or the folder icon in the Converter content
area. This will open a Finder window. In Finder, select the files or folders you need to import.
button or the folder icon in the Converter content
area. This will open a Finder window. In Finder, select the files or folders you need to import.
- Cancel Import: When you move the mouse over the file, a
 button will appear in the upper right
corner of the file view. Click it to cancel the import of that file.
button will appear in the upper right
corner of the file view. Click it to cancel the import of that file.
Step 3: Set the conversion save directory.
Click the  icon at the bottom of the Converter content area, which will open a
Finder window. In the
Finder window, select a directory and click the Open button. Alternatively, you can select Setting
in
the left column of the main interface. In the Setting interface, you can set the save directory for
video conversions.
icon at the bottom of the Converter content area, which will open a
Finder window. In the
Finder window, select a directory and click the Open button. Alternatively, you can select Setting
in
the left column of the main interface. In the Setting interface, you can set the save directory for
video conversions.
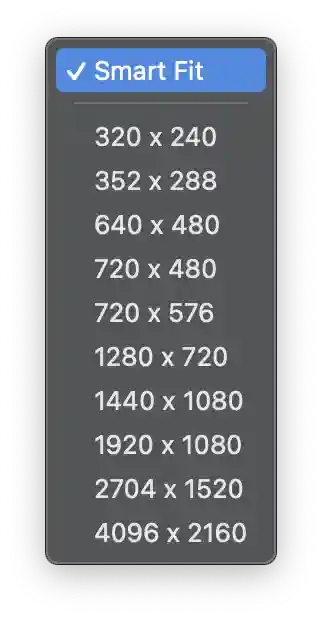
Step 4: Choose the output format for the conversion.
Click the  icon at the bottom of the Converter content area and select the format
you need to convert
to.
icon at the bottom of the Converter content area and select the format
you need to convert
to.
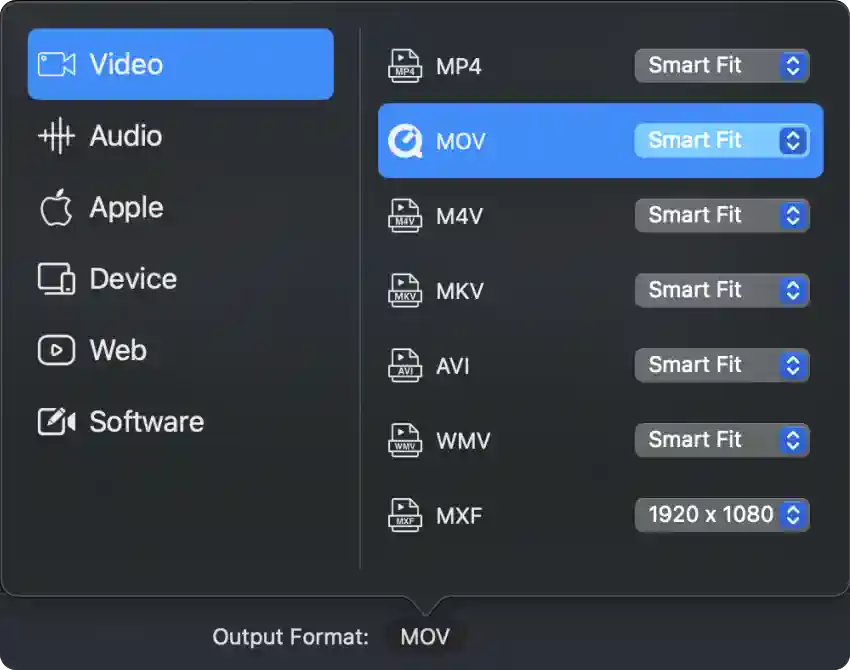
Generally, we recommend selecting the default Smart Fit resolution. This option typically maintains the original video resolution, but sometimes it will intelligently choose a different resolution based on the device on which the video will be played.
Step 5: Trim the Video
If you need to trim the video, click the  button to open the trimming window. If you do not need to trim the video, proceed to the next step.
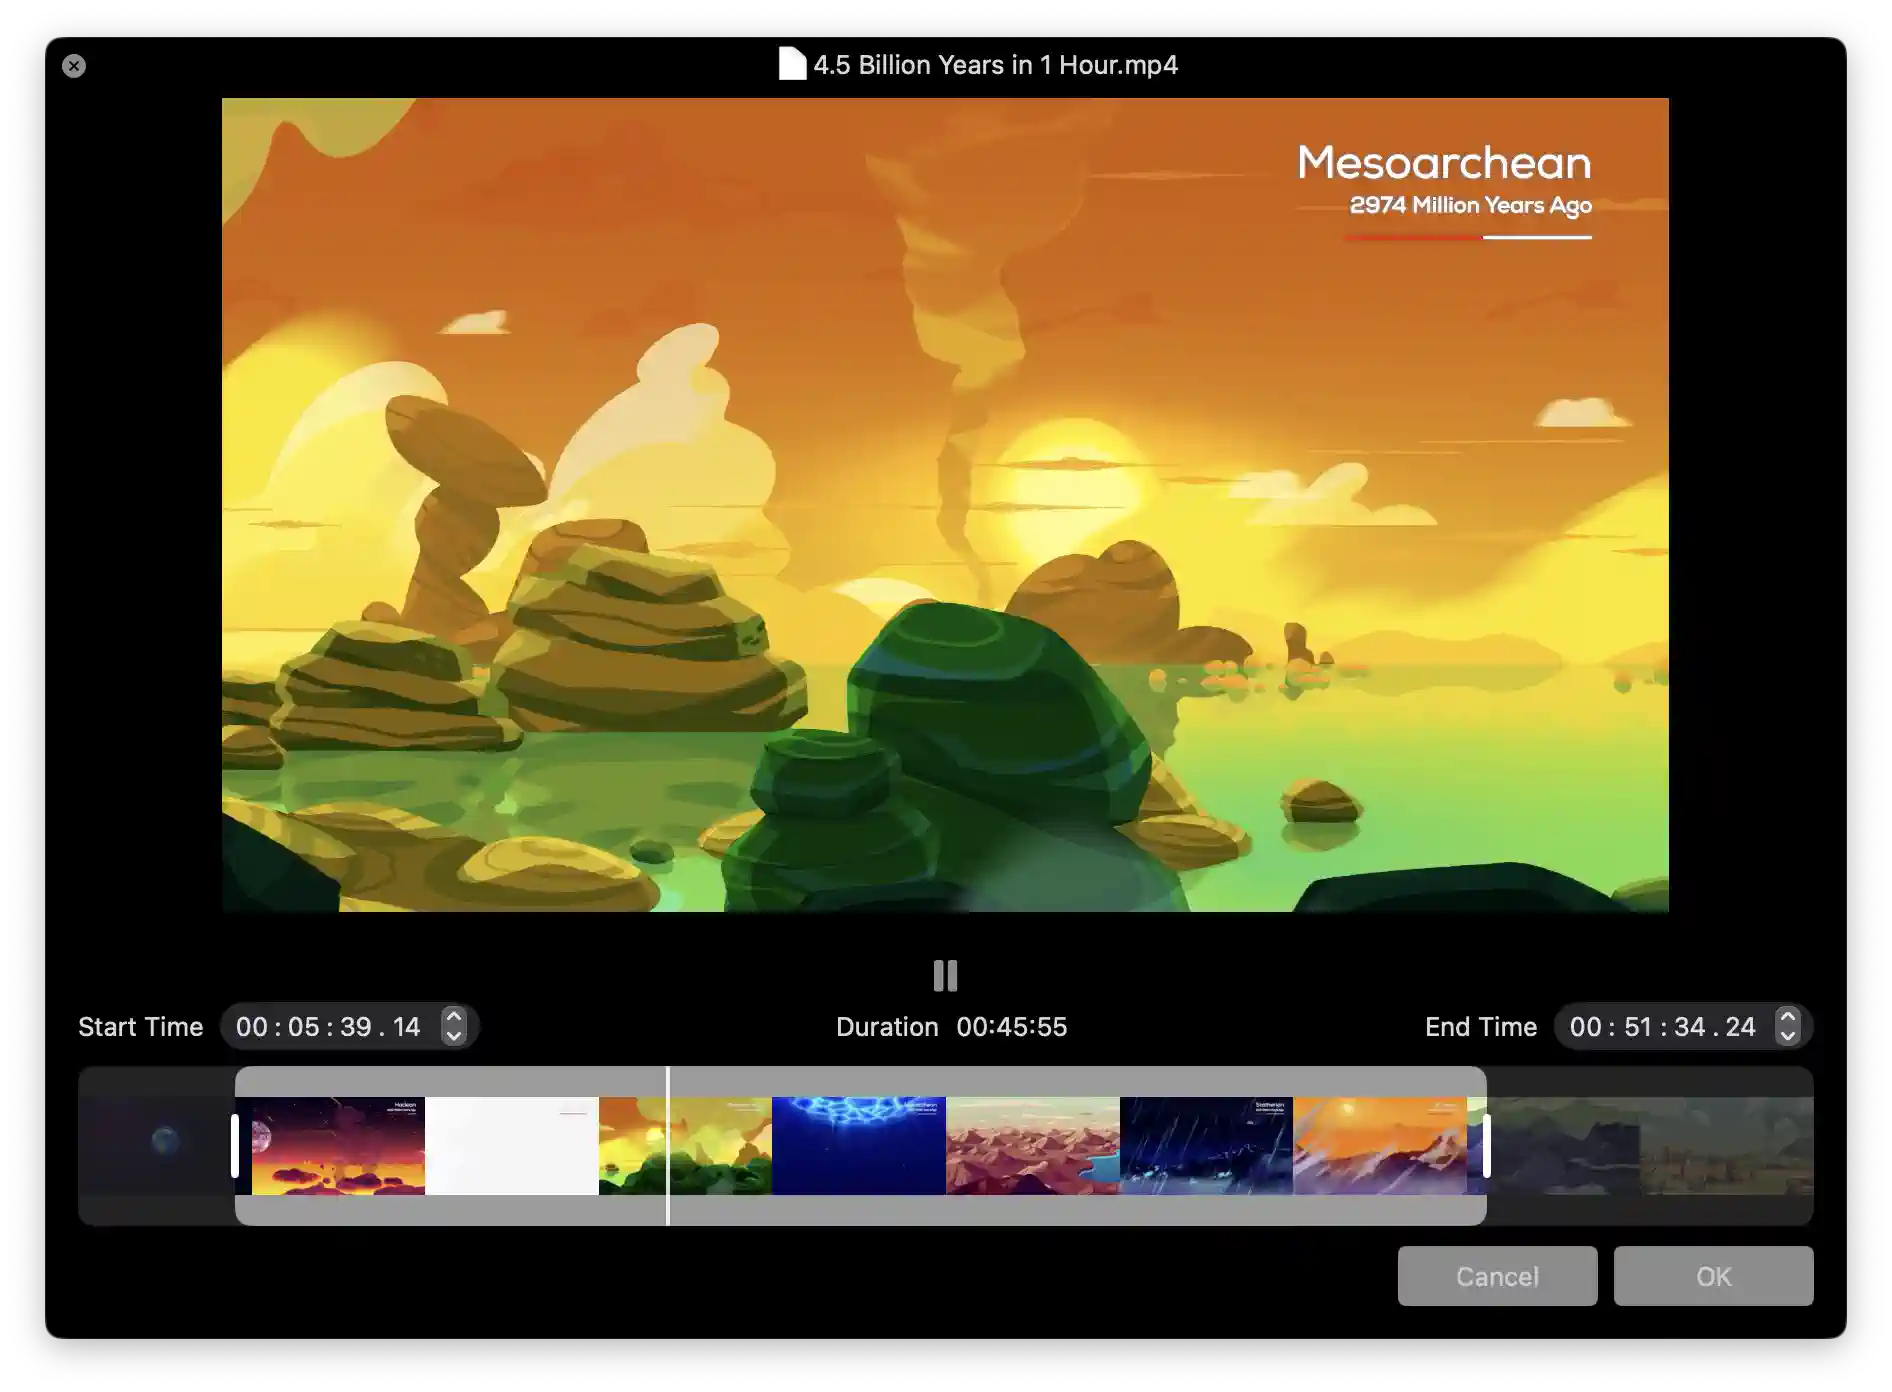
Start Time: The start time for trimming the audio or video.
Duration: The duration of the audio or video after trimming.
End Time: The end time for trimming the audio or video.
Below the trimming time settings, the trimming edit view is displayed:
- The vertical capsule on the left indicates the start position for trimming.
- The vertical capsule on the right indicates the end position for trimming.
- The vertical line in the middle indicates the playback position.
- The gray area represents the part of the video that will be trimmed out.
How to Trim a Video?
- Using the Time View: Edit the hours, minutes, and seconds in the trimming start time or end time fields. The decimal point after the seconds represents hundredths of a second. You can click the up and down arrows to set the trimming position frame by frame accurately.
- Using the Trimming View: Move the cursor over the start or end capsule icon and drag to set the start or end time for trimming.
- Once set, click the OK button.
Step 6: Start the Conversion
Click the  button in the lower right corner of the Converter content area to convert
all the audio and
video files that have been added. Clicking the
button in the lower right corner of the Converter content area to convert
all the audio and
video files that have been added. Clicking the  button
in a single audio or video item will convert only
the selected audio or video file. After clicking to start the conversion, the interface will display
the
conversion progress and the remaining time.
button
in a single audio or video item will convert only
the selected audio or video file. After clicking to start the conversion, the interface will display
the
conversion progress and the remaining time.
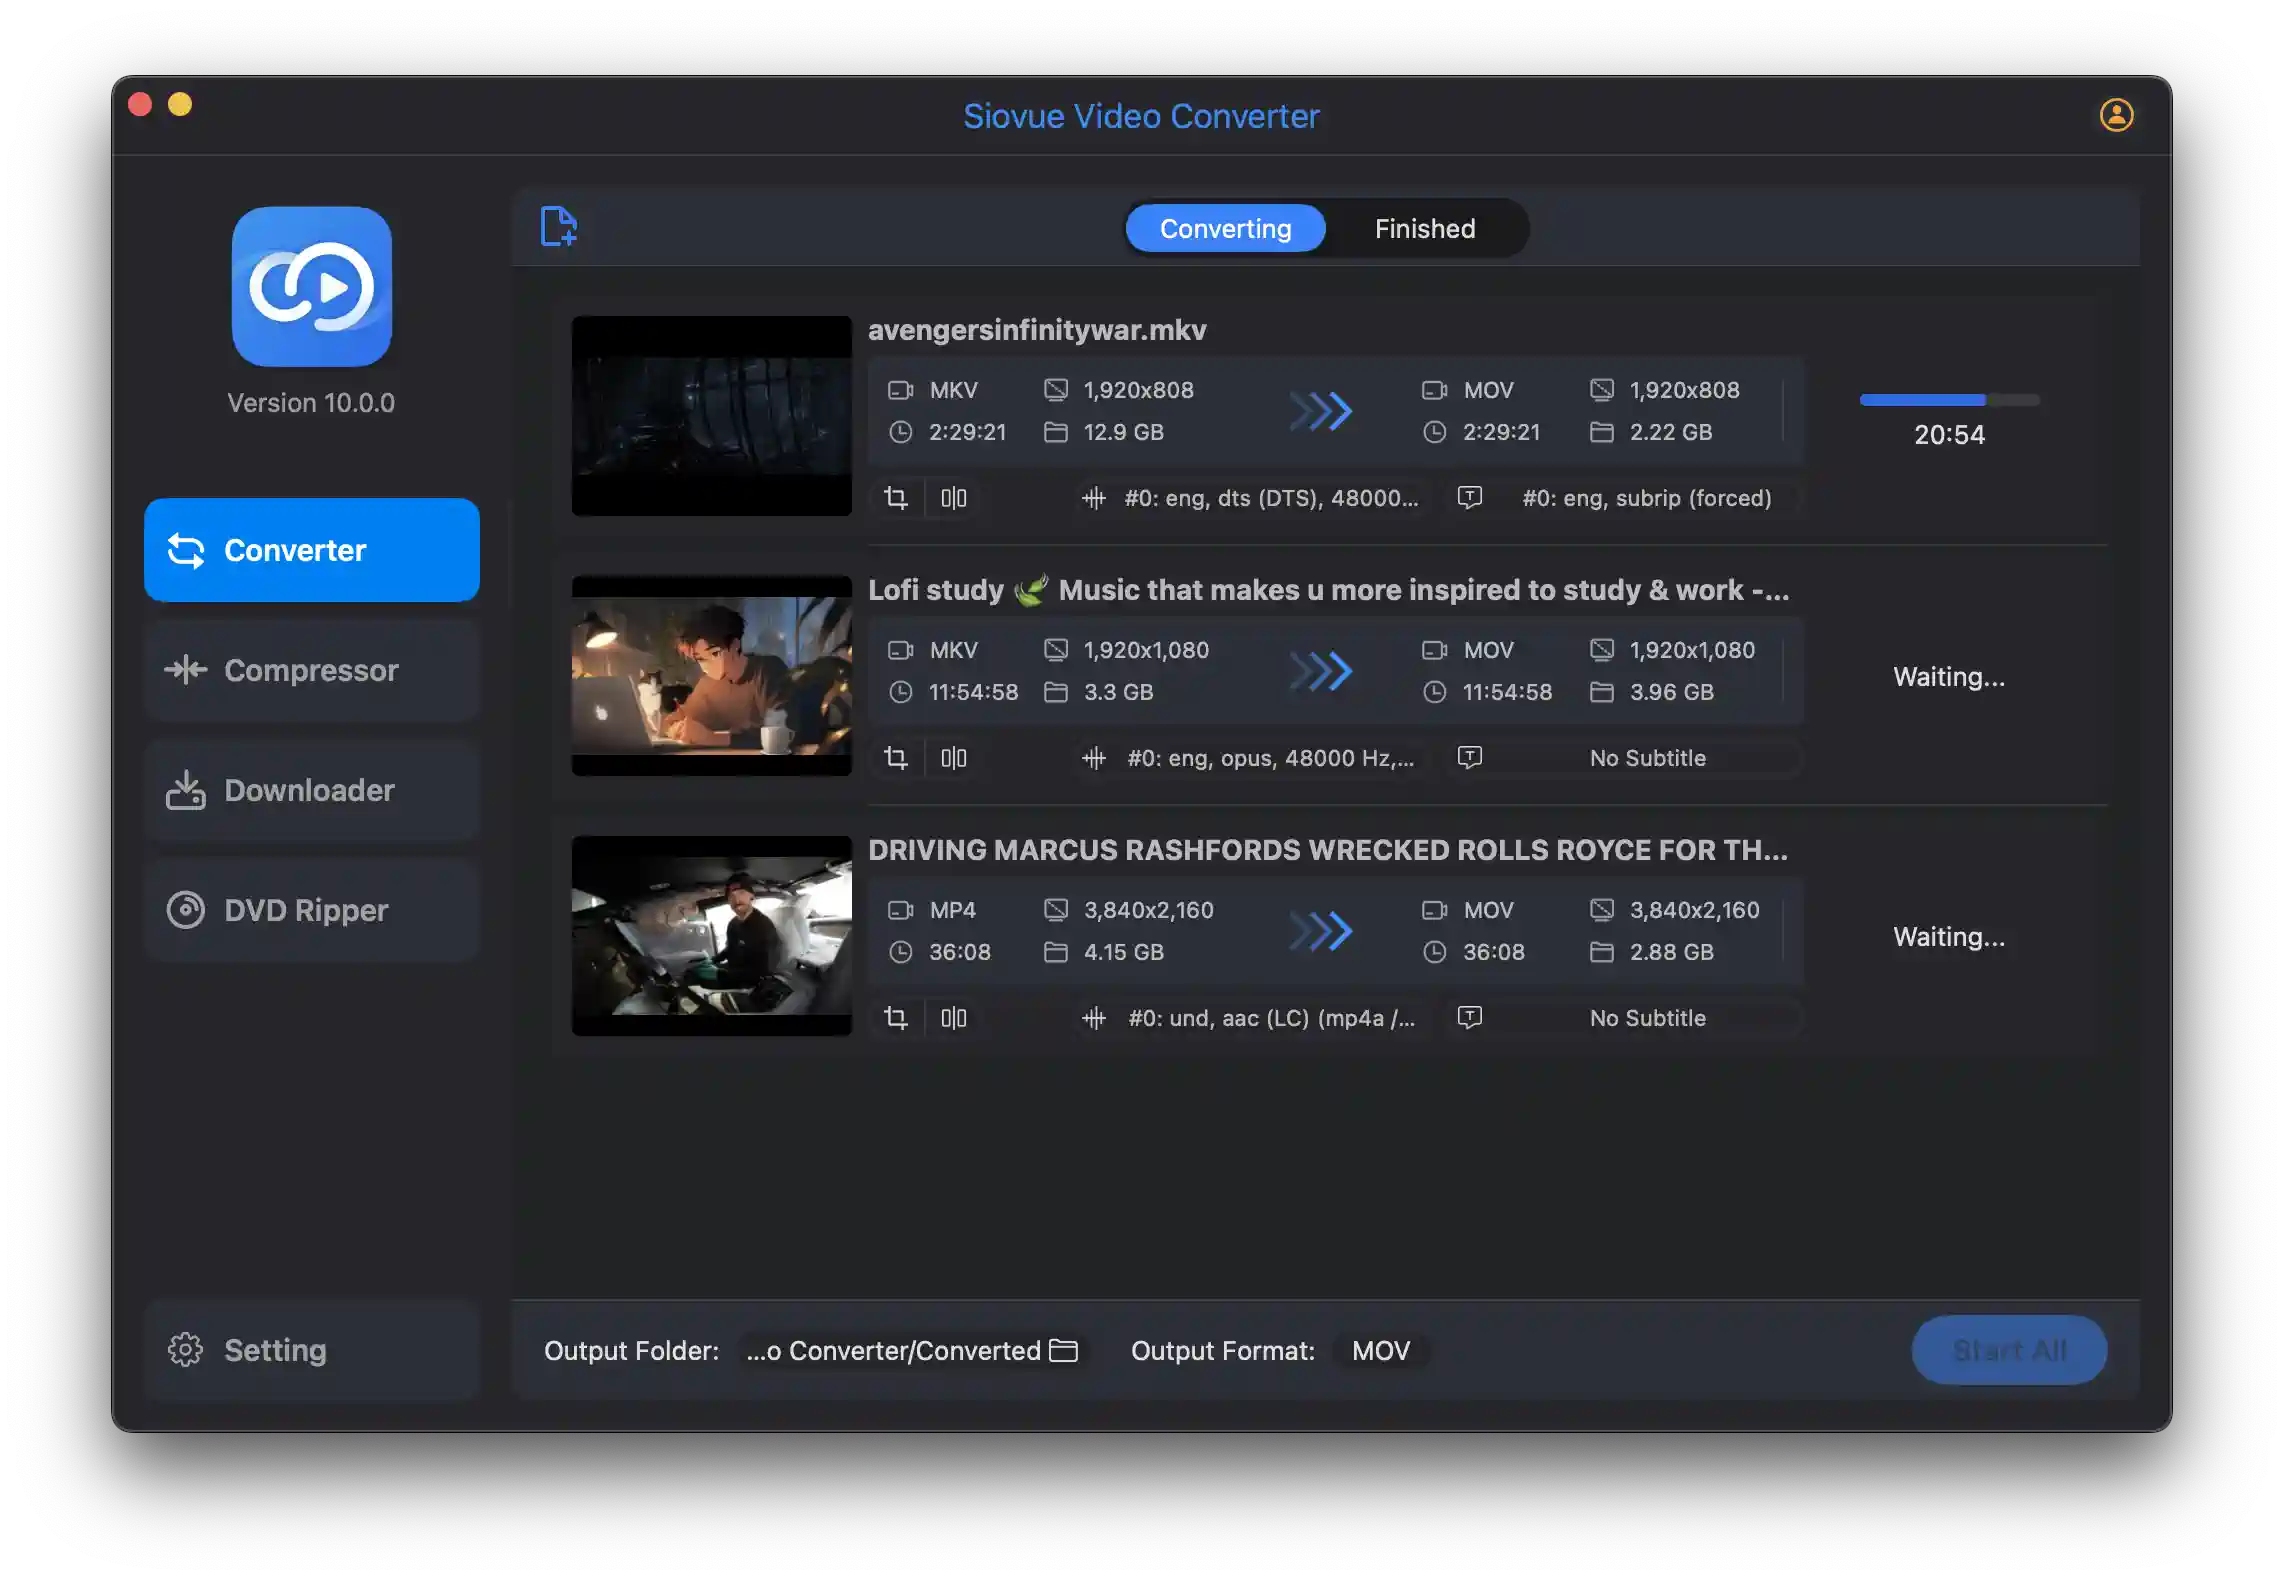
Step 7: View the Converted Files
When video conversion is completed, the number of newly converted files will be displayed on the tab
at
the top of the conversion interface ![]() . Click the Finished button to view the converted audio and video
files.
. Click the Finished button to view the converted audio and video
files.
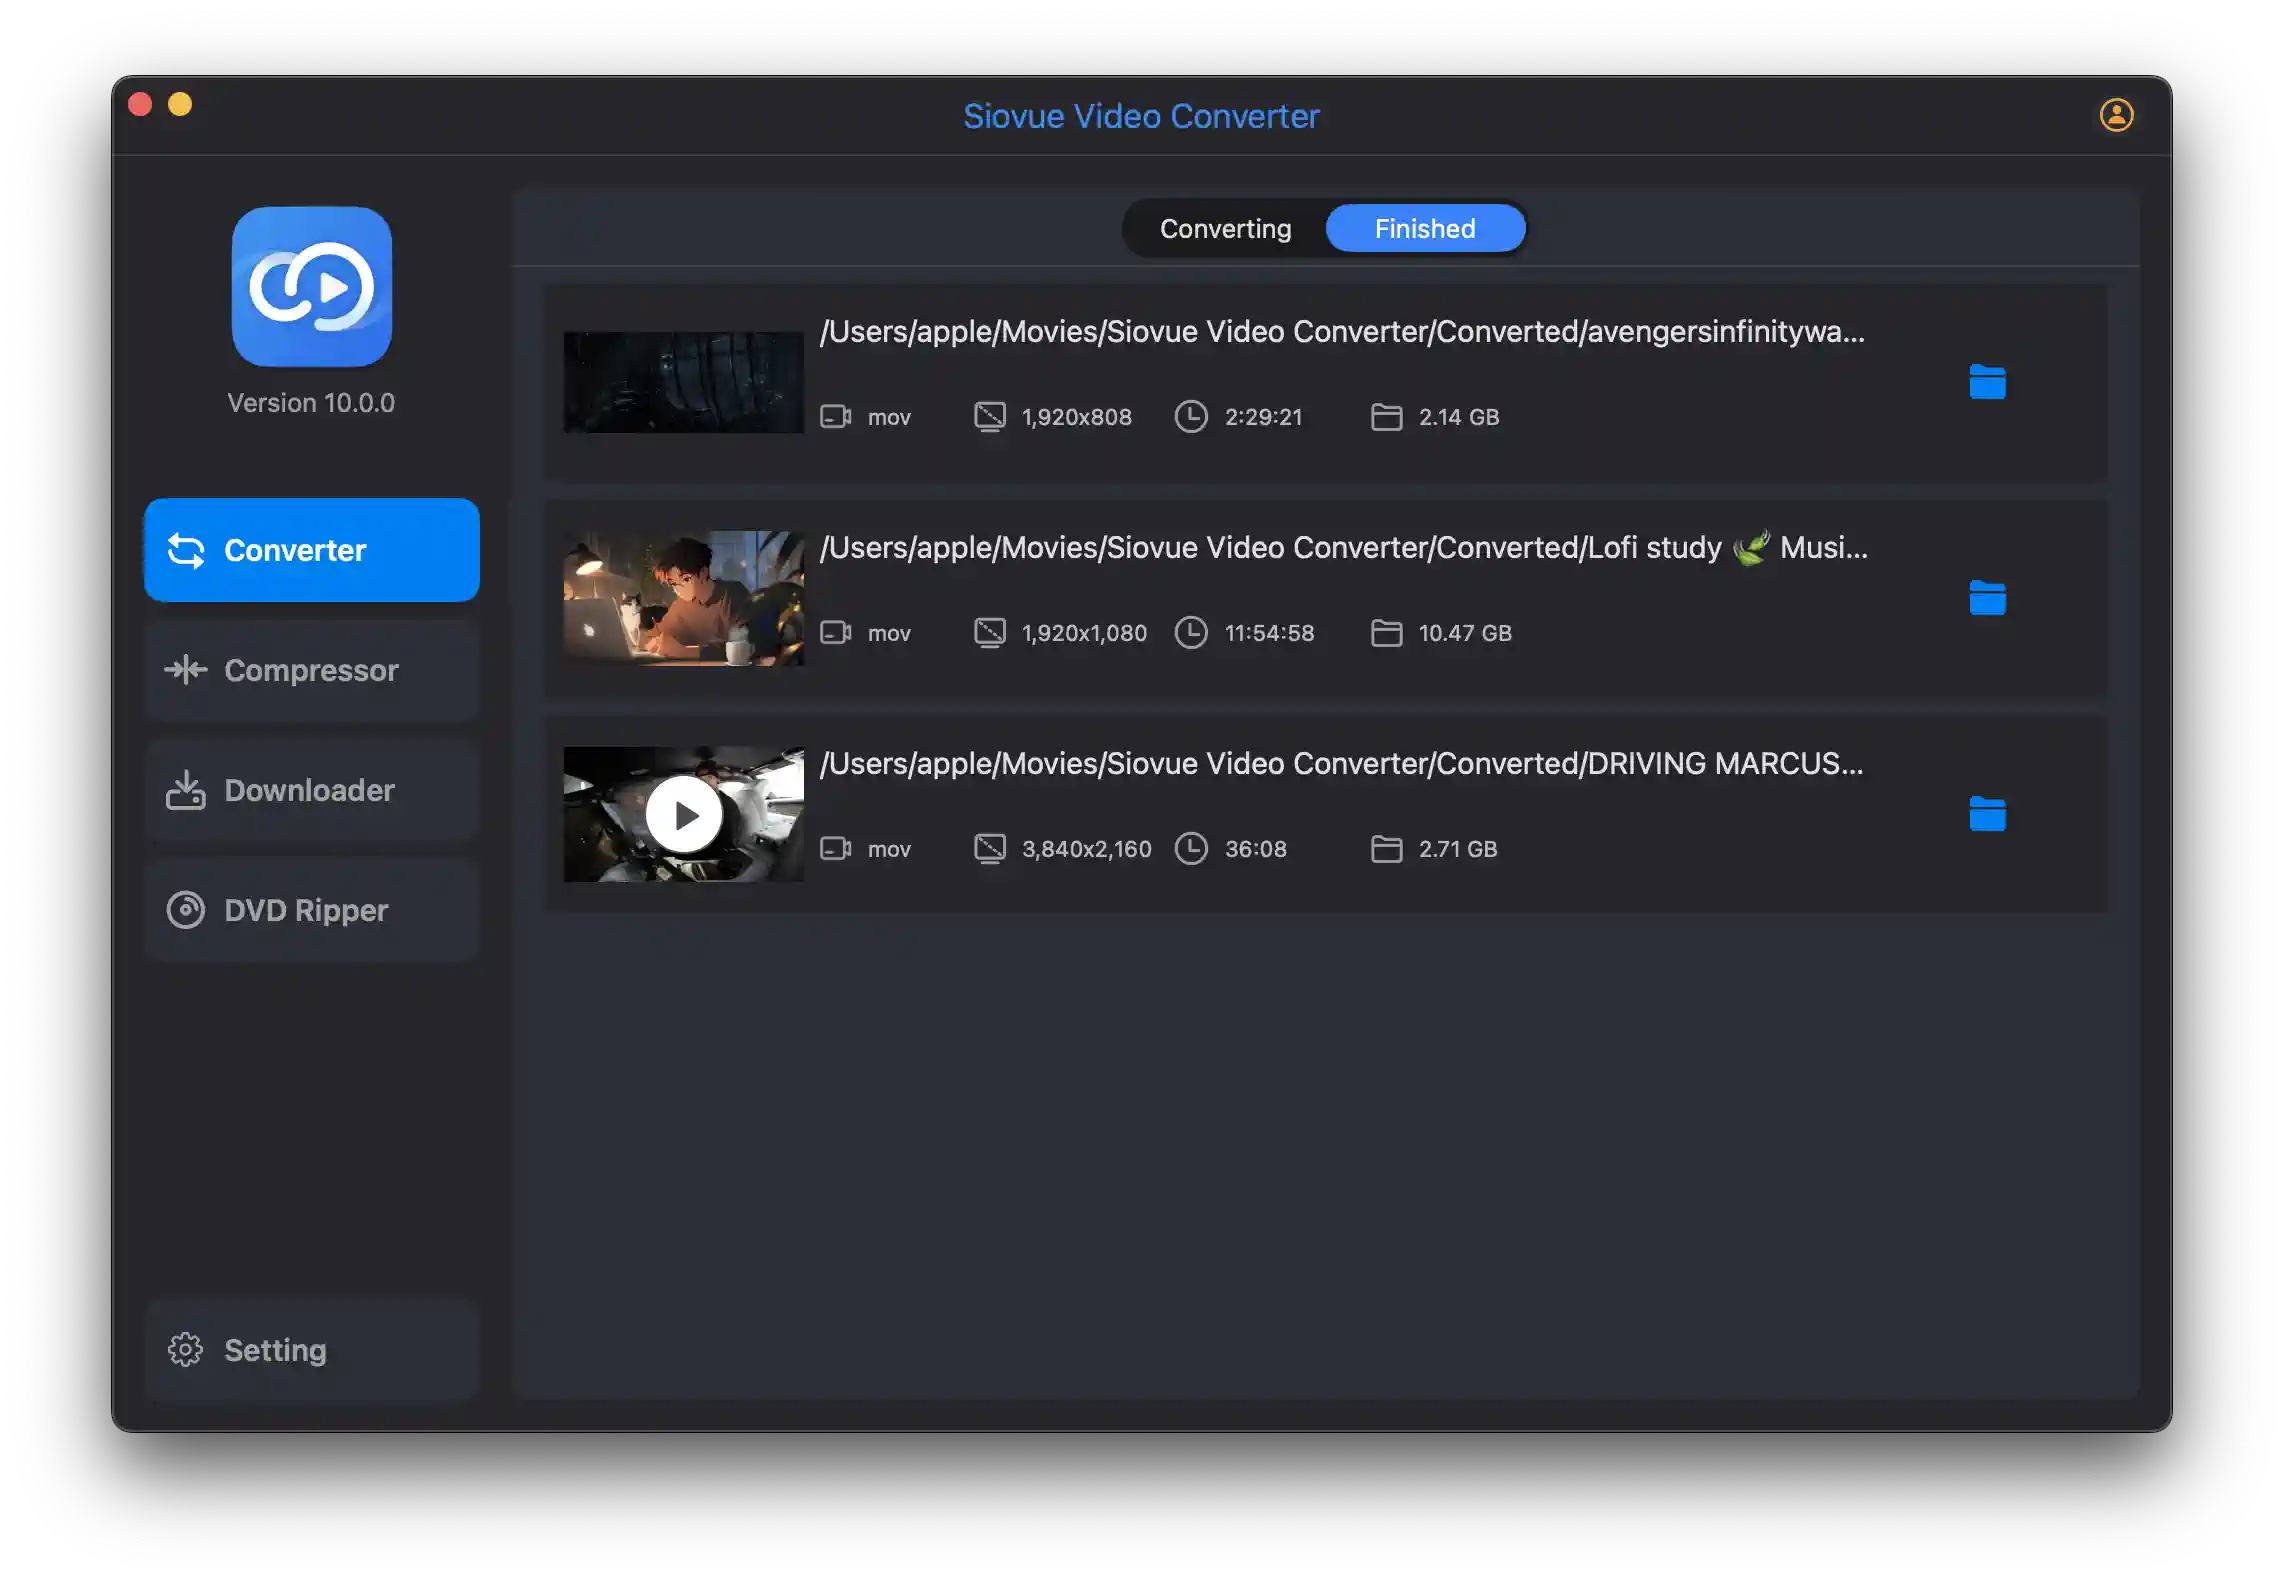
Each converted file will display the converted file format, resolution, duration, and size.
- Click the
 button to display the converted file in Finder.
- Click the
 button to play the converted file, allowing you to check if the
converted file meets your requirements.
button to play the converted file, allowing you to check if the
converted file meets your requirements.
Part 3: Video Compression
Video compression is primarily used to reduce the size of video files, saving storage space and transmission bandwidth. It also optimizes and adjusts the video quality, making the video more suitable for playback in specific scenarios.
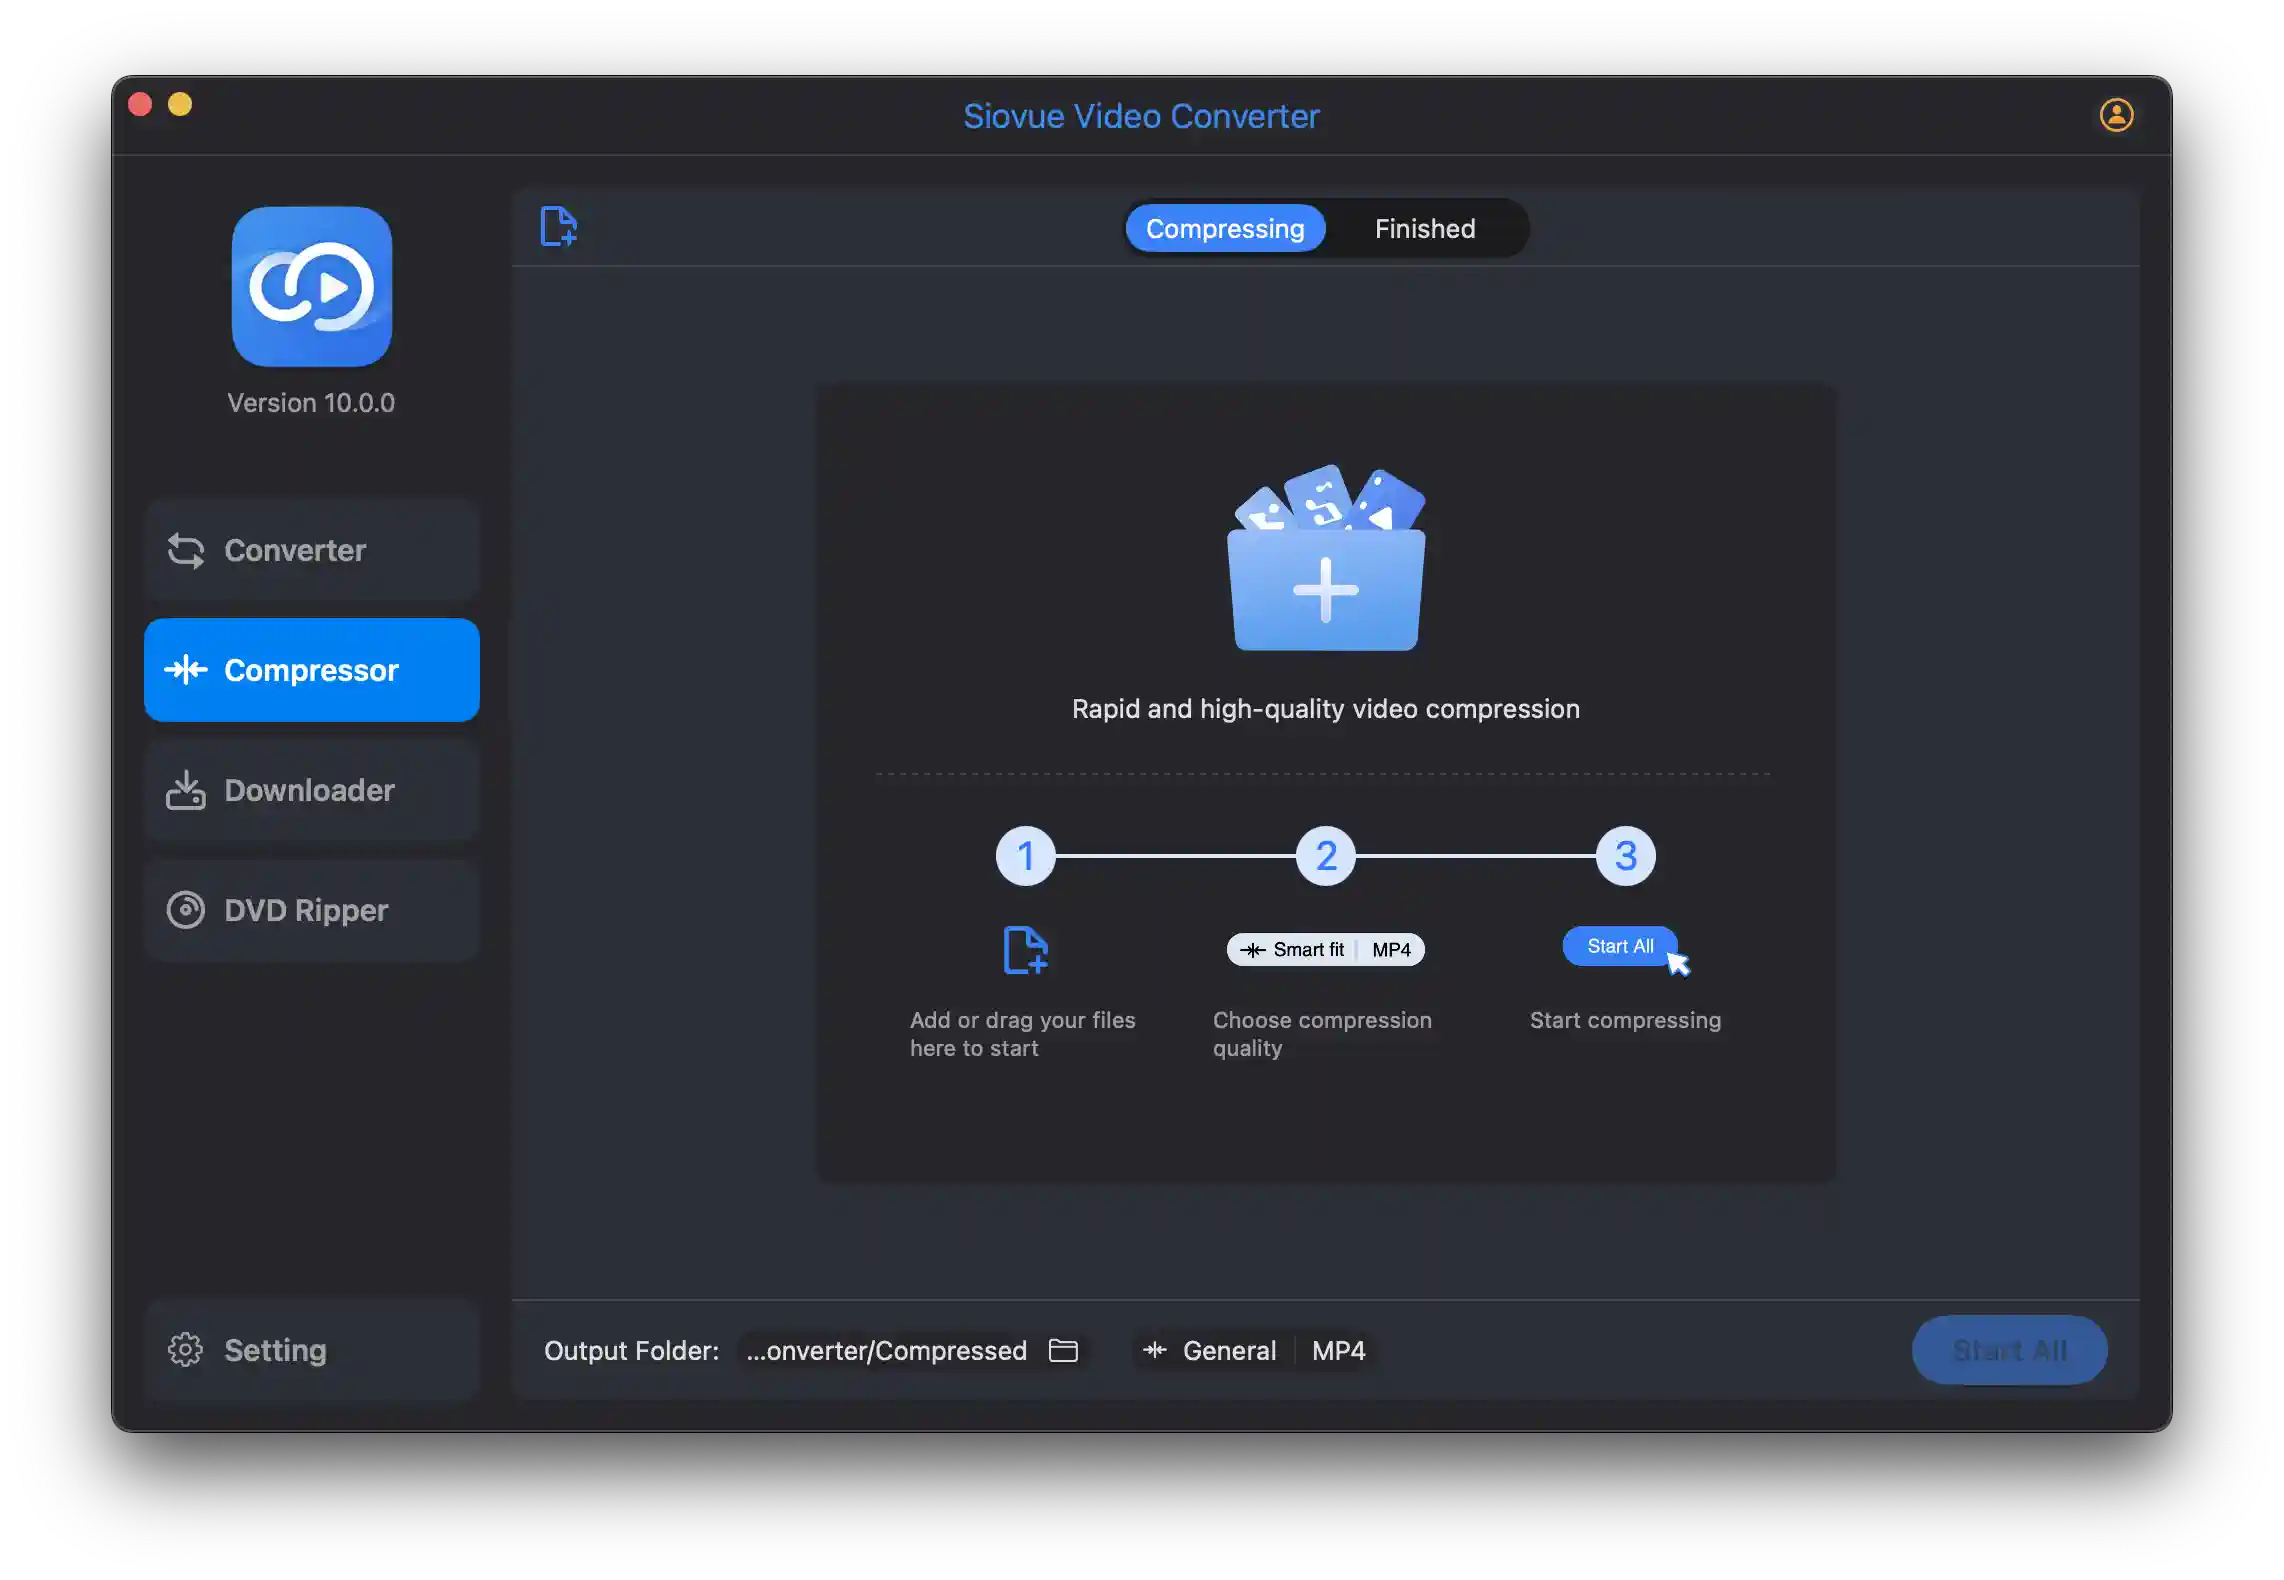
How to Compress Video?
Step 1: Select Compressor in the left column of the main interface.
Step 2: Add video files.
- Drag and Drop Import: Drag the files into the Compressor content area.
- Finder Import: Click the button or
the folder icon in the Compressor content area. This will open a Finder window. In Finder,
select the files or folders you need to import.
- Cancel Import: When you move the mouse over the file, a button will
appear in the upper right corner of the file view. Click it to cancel the import of that file.
Step 3: Set the compression save directory.
Click the  icon at the bottom of the Compressor content area, which will open a Finder
window. In the Finder window, select a directory and click the Open button. Alternatively, you
can select Setting in the left column of the main interface. In the Setting interface, you can
set the save directory for video compression.
icon at the bottom of the Compressor content area, which will open a Finder
window. In the Finder window, select a directory and click the Open button. Alternatively, you
can select Setting in the left column of the main interface. In the Setting interface, you can
set the save directory for video compression.
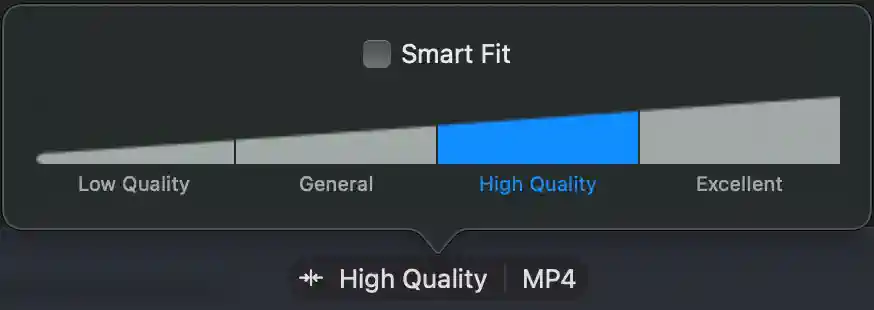
Step 4: Choose the compression quality.
- Set for all videos: Click the
 icon at the bottom of the Compressor content area.
- Set for a single video: Click the icon in the video view. This will open the compression quality view, where you
can select the compression quality that suits your needs.
Step 5: Start Compression
Click the button in the lower right corner of the Compressor content area to compress all
the video files that have been added. Clicking the  button in a single audio or video item will compress only the selected audio or video file.
After clicking to start the compression, the interface will display the compression progress and
the remaining time.
button in a single audio or video item will compress only the selected audio or video file.
After clicking to start the compression, the interface will display the compression progress and
the remaining time.
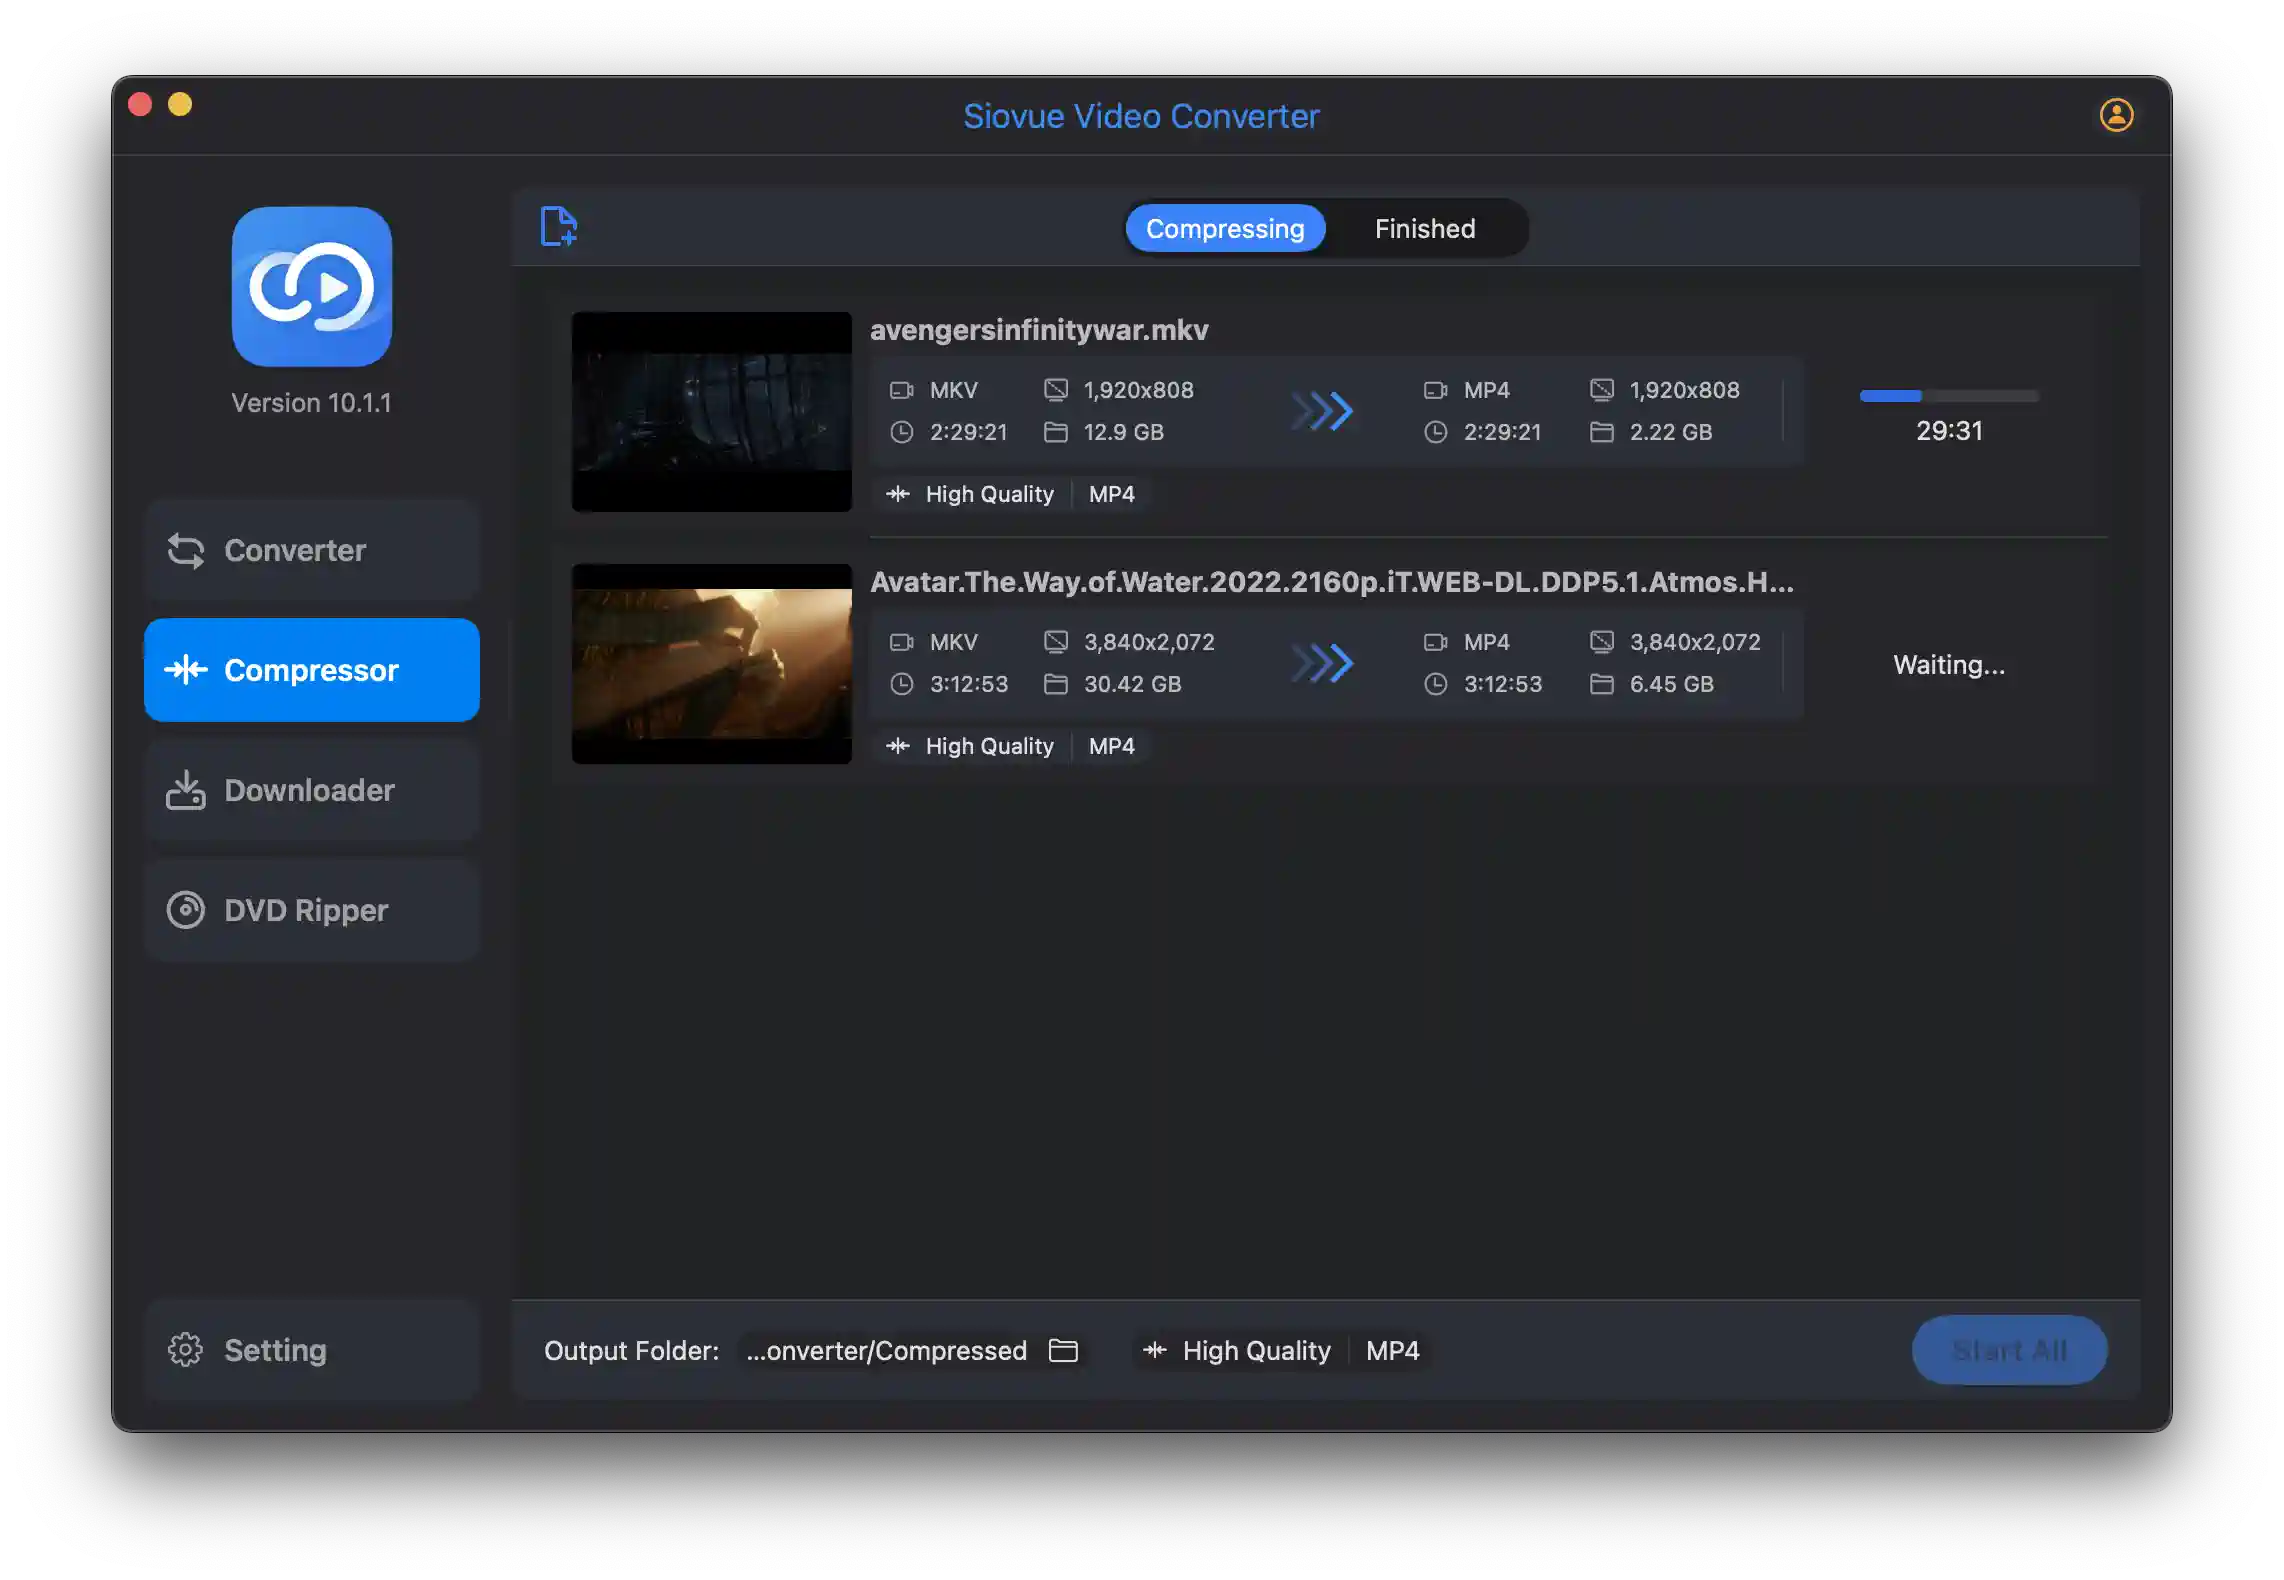
Step 6: View the Compressed Files
When video compression is completed, the number of newly compressed files will be displayed on the
tab at the top of the compression interface![]() . Click the Finished button to view the compressed videos.
. Click the Finished button to view the compressed videos.
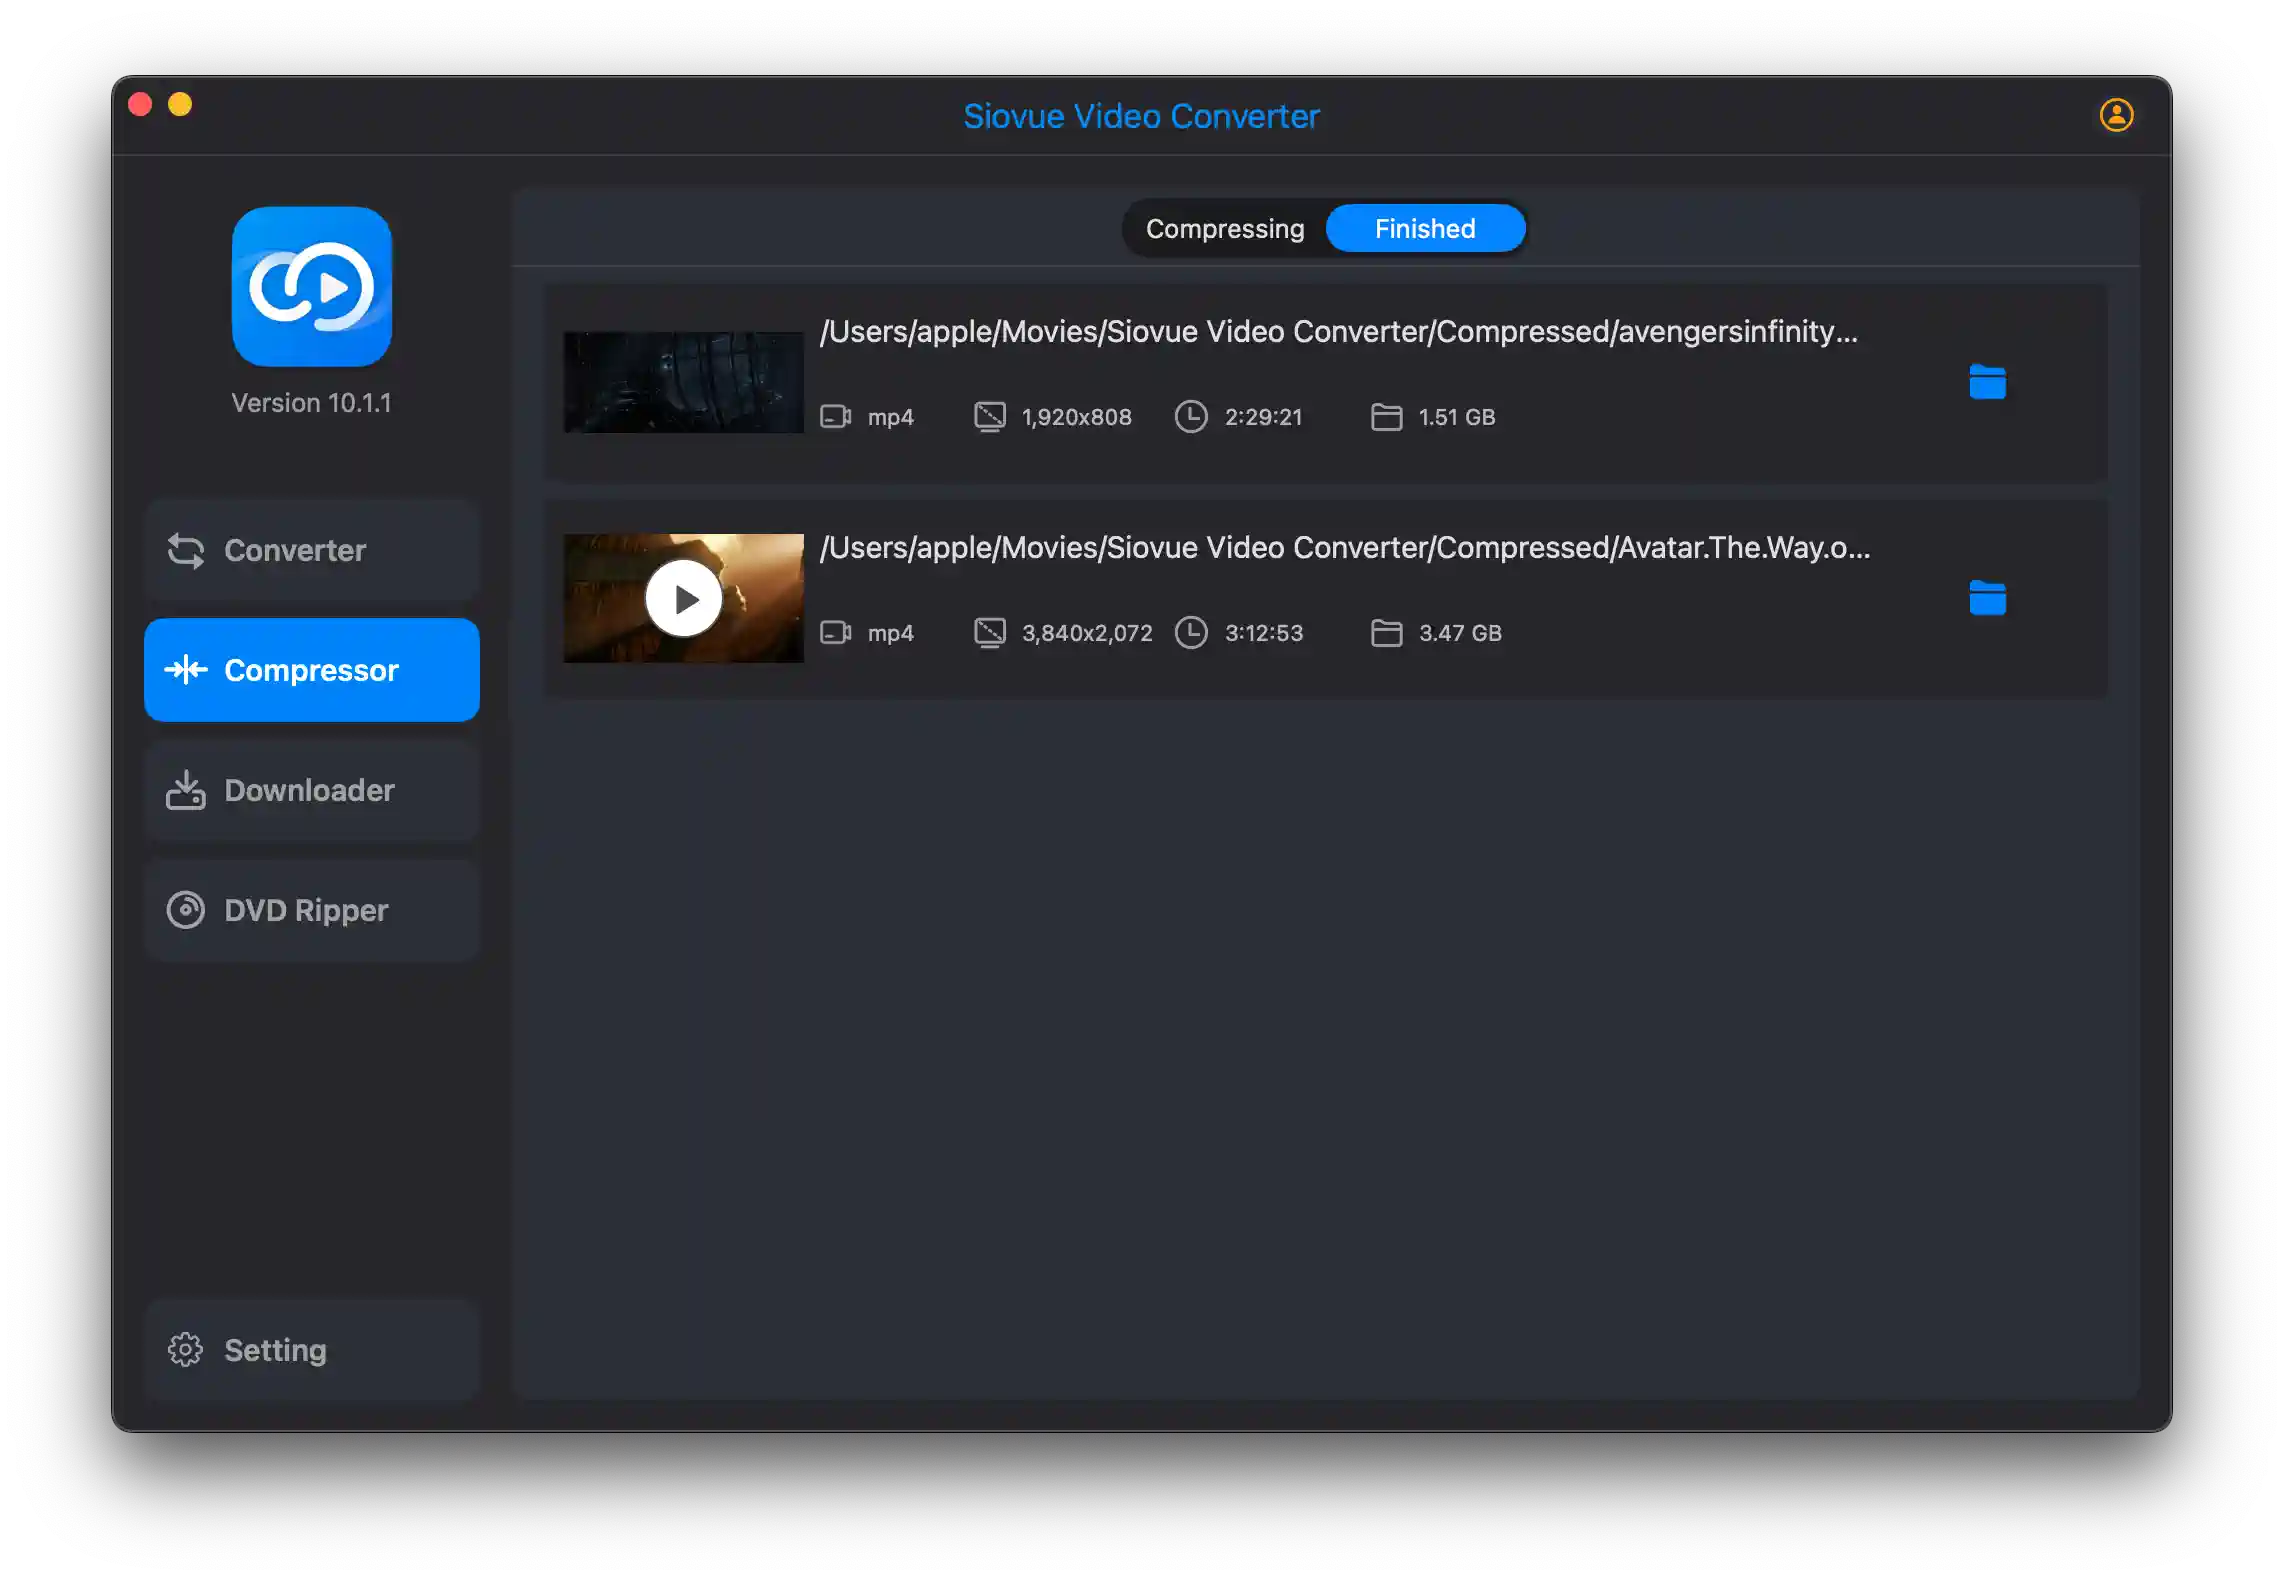
Each compressed file will display the converted file format, resolution, duration, and size.
- Click the button to display the compressed file in Finder.
- Click the button to play the compressed file, allowing you to check if the
compressed file meets your requirements.
Part 4: Video Downloader
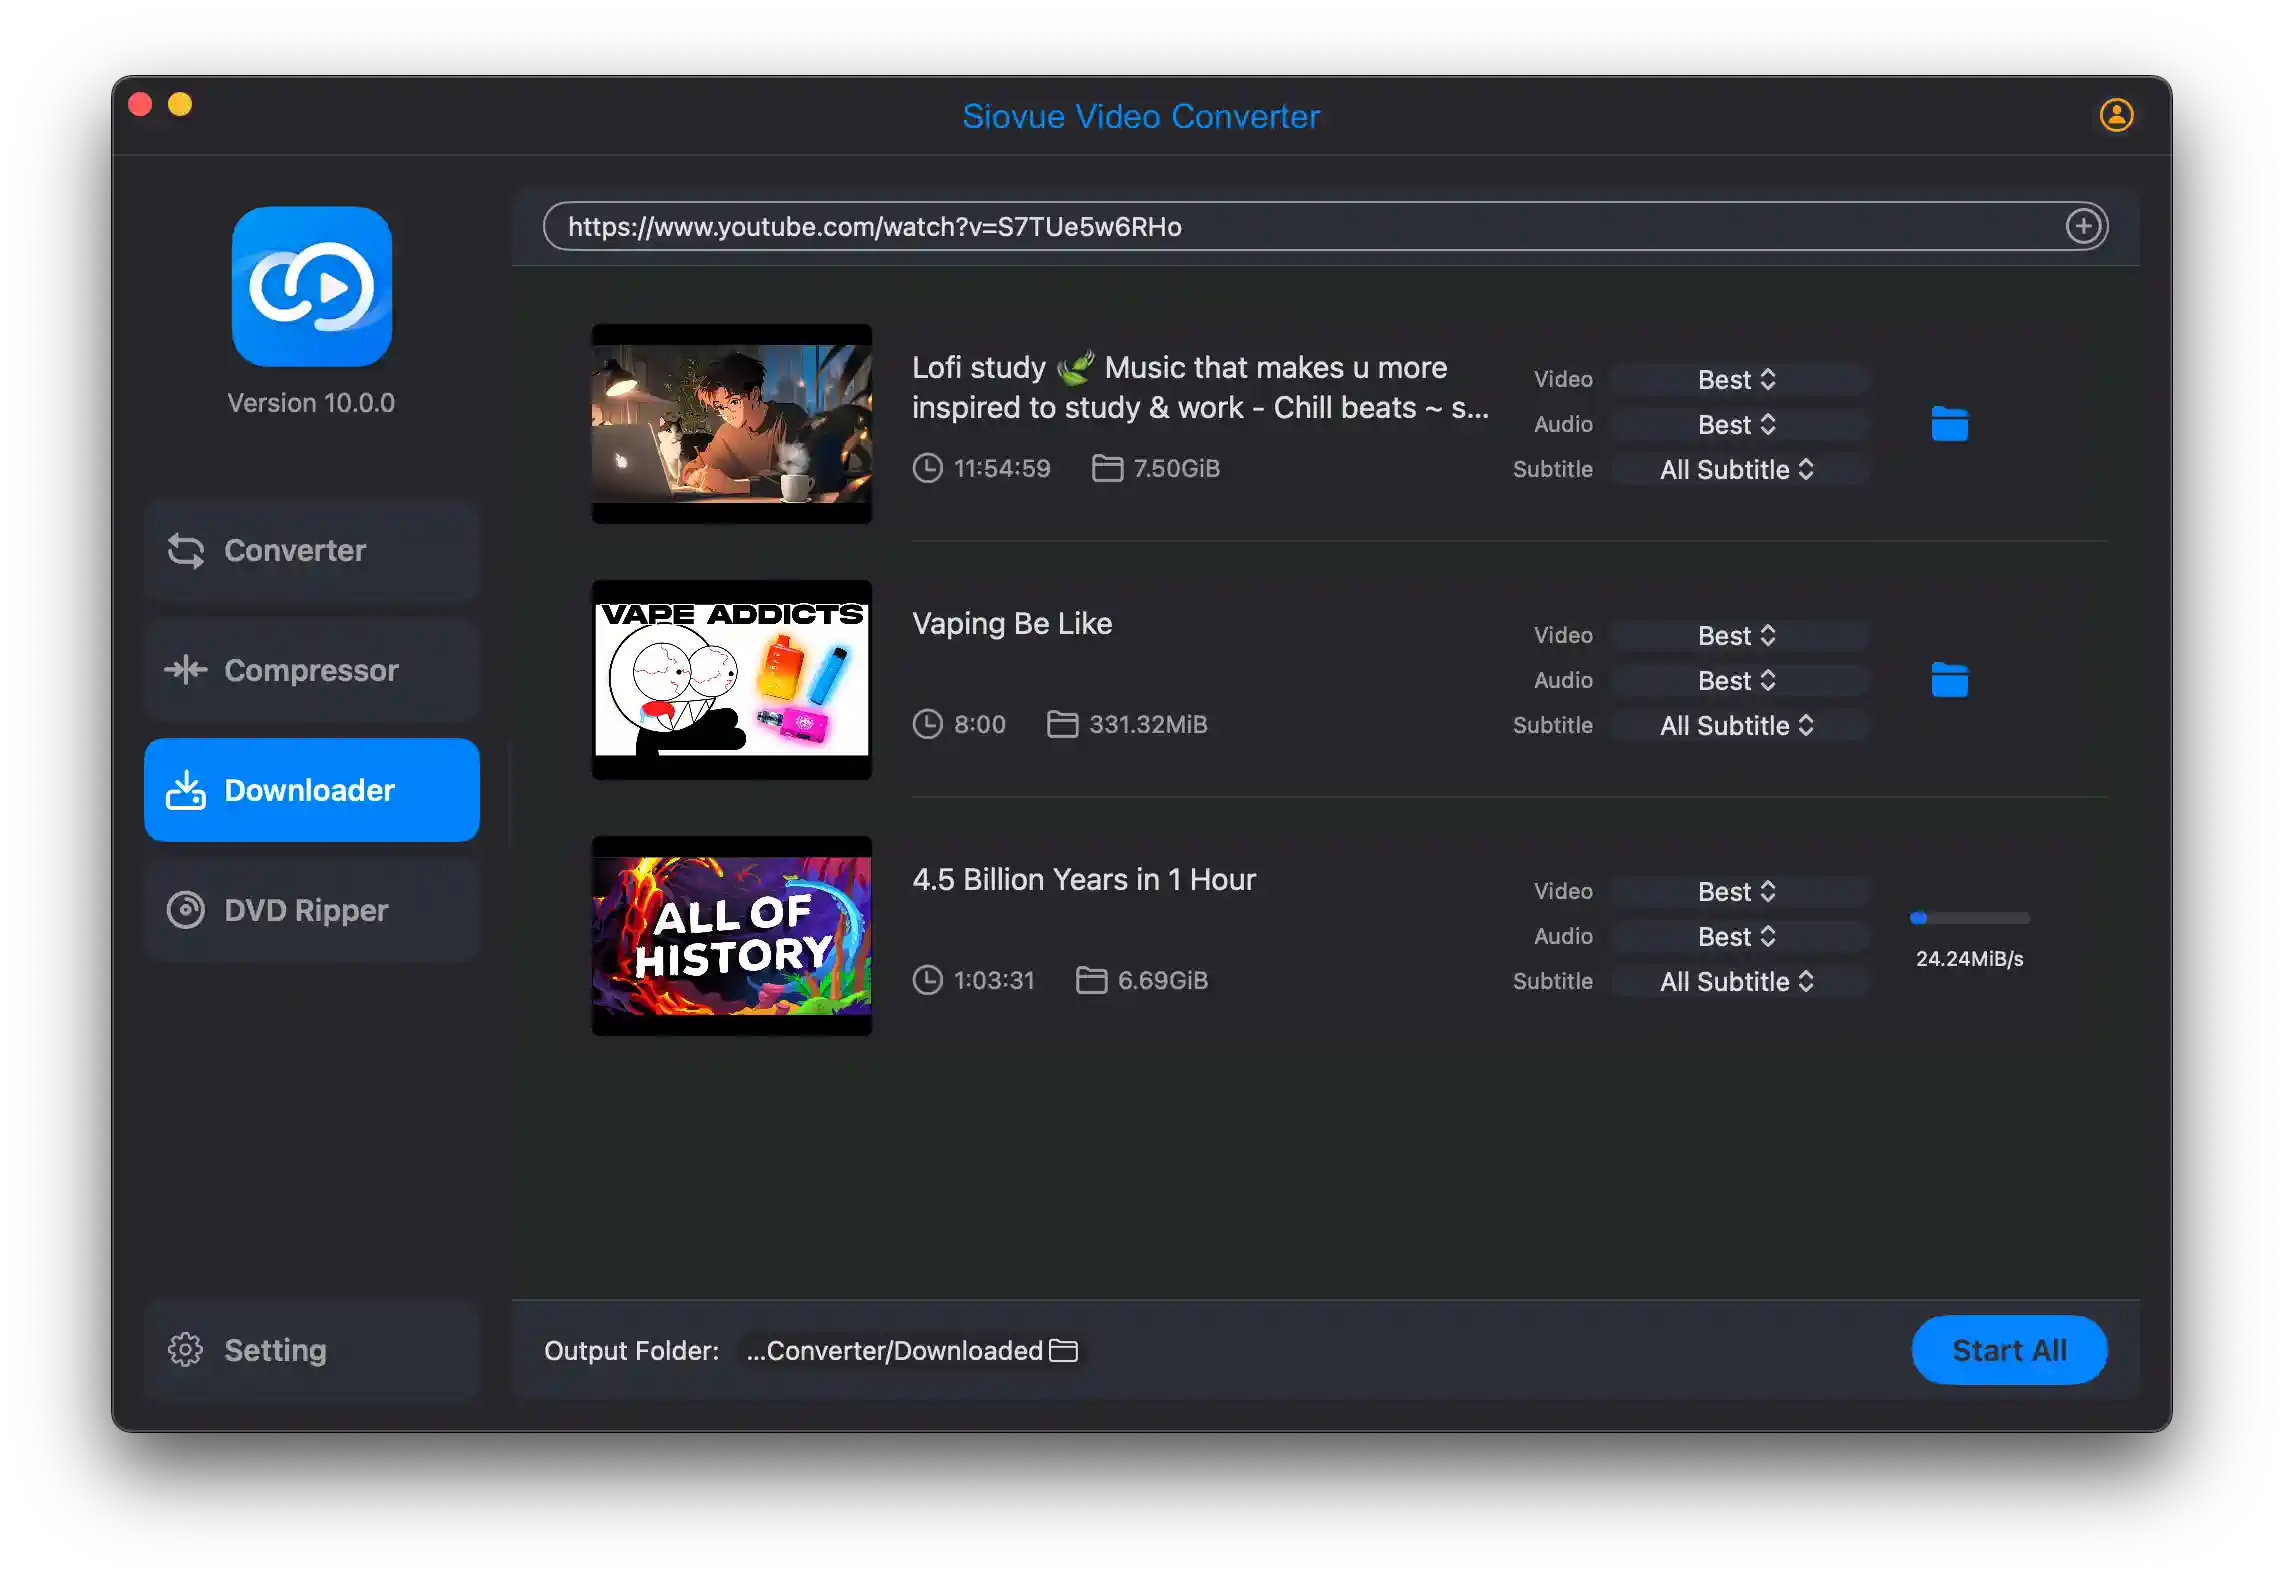
Download your favorite music and videos without worrying about network connections or data consumption! No matter which platform your favorite videos are on, we can help you download them. Siovue Video Converter supports not only mainstream video websites such as YouTube, Facebook, Instagram, and Vimeo, but also over 1200 music and video websites.
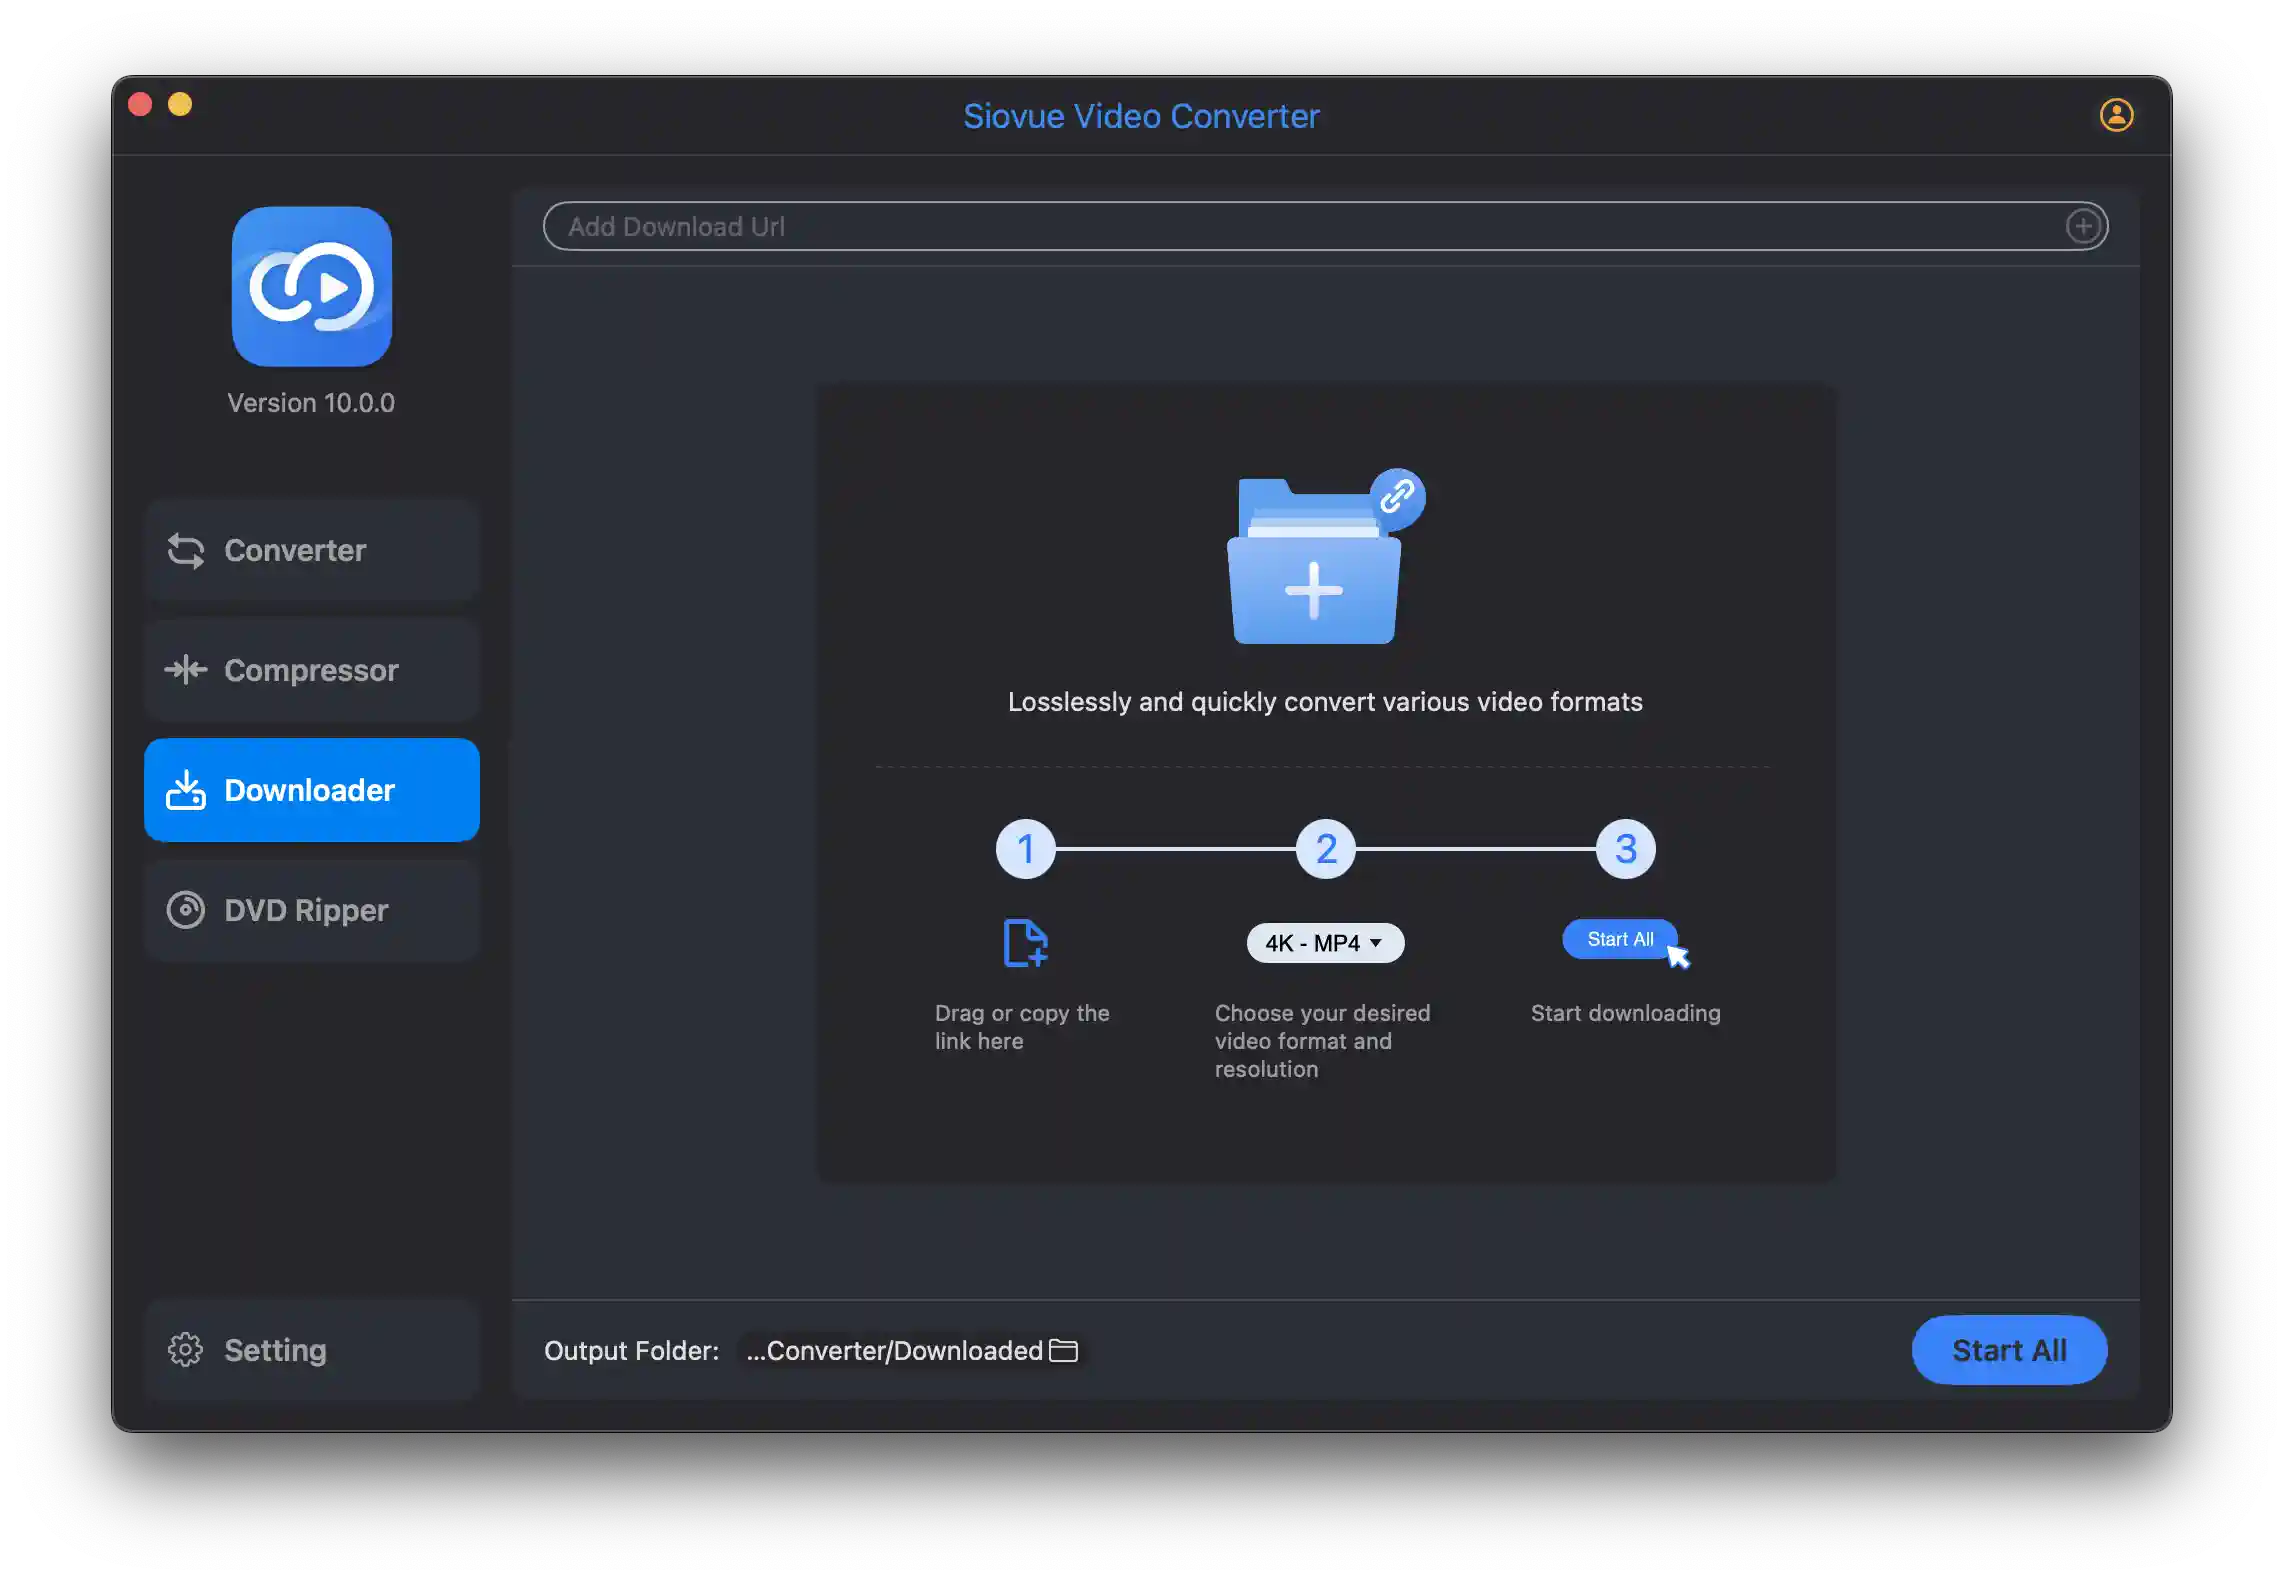
How to Add Audio/Video Links to Download Videos?
Select Downloader in the left column of the main interface.
Step 1: Add Video Links
- Drag and Drop Links: Drag the video link from your browser or other applications into the Downloader content area to add it.
- Copy and Paste Links: Copy the video link and paste it into the address bar at the top of the Downloader content area and press Enter to add the link.
Step 2: Choose Download Quality and Format
After loading the link, Siovue Video Converter will automatically select the best quality audio and video. You can also manually select according to your needs:
- Video Resolution and Format: Use the simple drop-down menu or settings options to choose the desired video resolution and format.
- Audio Format and Bitrate: Similarly, you can choose the audio format and bitrate according to your needs.
Step 3: Choose Subtitles
If the video offers subtitle options, you can choose whether to download subtitles and select multiple subtitles if available. If the video website has an online subtitle generation feature, you can also download the generated subtitles (supported on YouTube only).
Step 4: Set Download Save Directory
Click the  icon at the bottom of the Downloader content area, which will open a
Finder window. In the
Finder window, select a directory and click the Open button. Alternatively, you can select Setting
in the left column of the main interface. In the Setting interface, you can set the save directory
for the Downloader.
icon at the bottom of the Downloader content area, which will open a
Finder window. In the
Finder window, select a directory and click the Open button. Alternatively, you can select Setting
in the left column of the main interface. In the Setting interface, you can set the save directory
for the Downloader.
Step 5: Start Downloading
Click the button in the lower right corner to download all the videos that have been
loaded. Clicking
the ![]() button in a single video item will download only that video. After clicking to
start the
download, the interface will display the download progress and download speed.
button in a single video item will download only that video. After clicking to
start the
download, the interface will display the download progress and download speed.
Step 6: View the Downloaded Files
Once the download is complete, you can click the ![]() button to display the downloaded files in
Finder.
button to display the downloaded files in
Finder.
Note: When using the Video Downloader feature, ensure you have the right to download and use the video content. Comply with relevant laws, regulations, and copyright requirements, and respect others' intellectual property rights.
Part 5: DVD Ripper
Siovue Video Converter provides a DVD Ripper feature, allowing users to convert DVD content into common audio and video formats, making it easy to play on different devices or platforms. Whether it's treasured movies, home videos, or other DVD content, this feature lets you convert them effortlessly while preserving the original quality and audio effects.
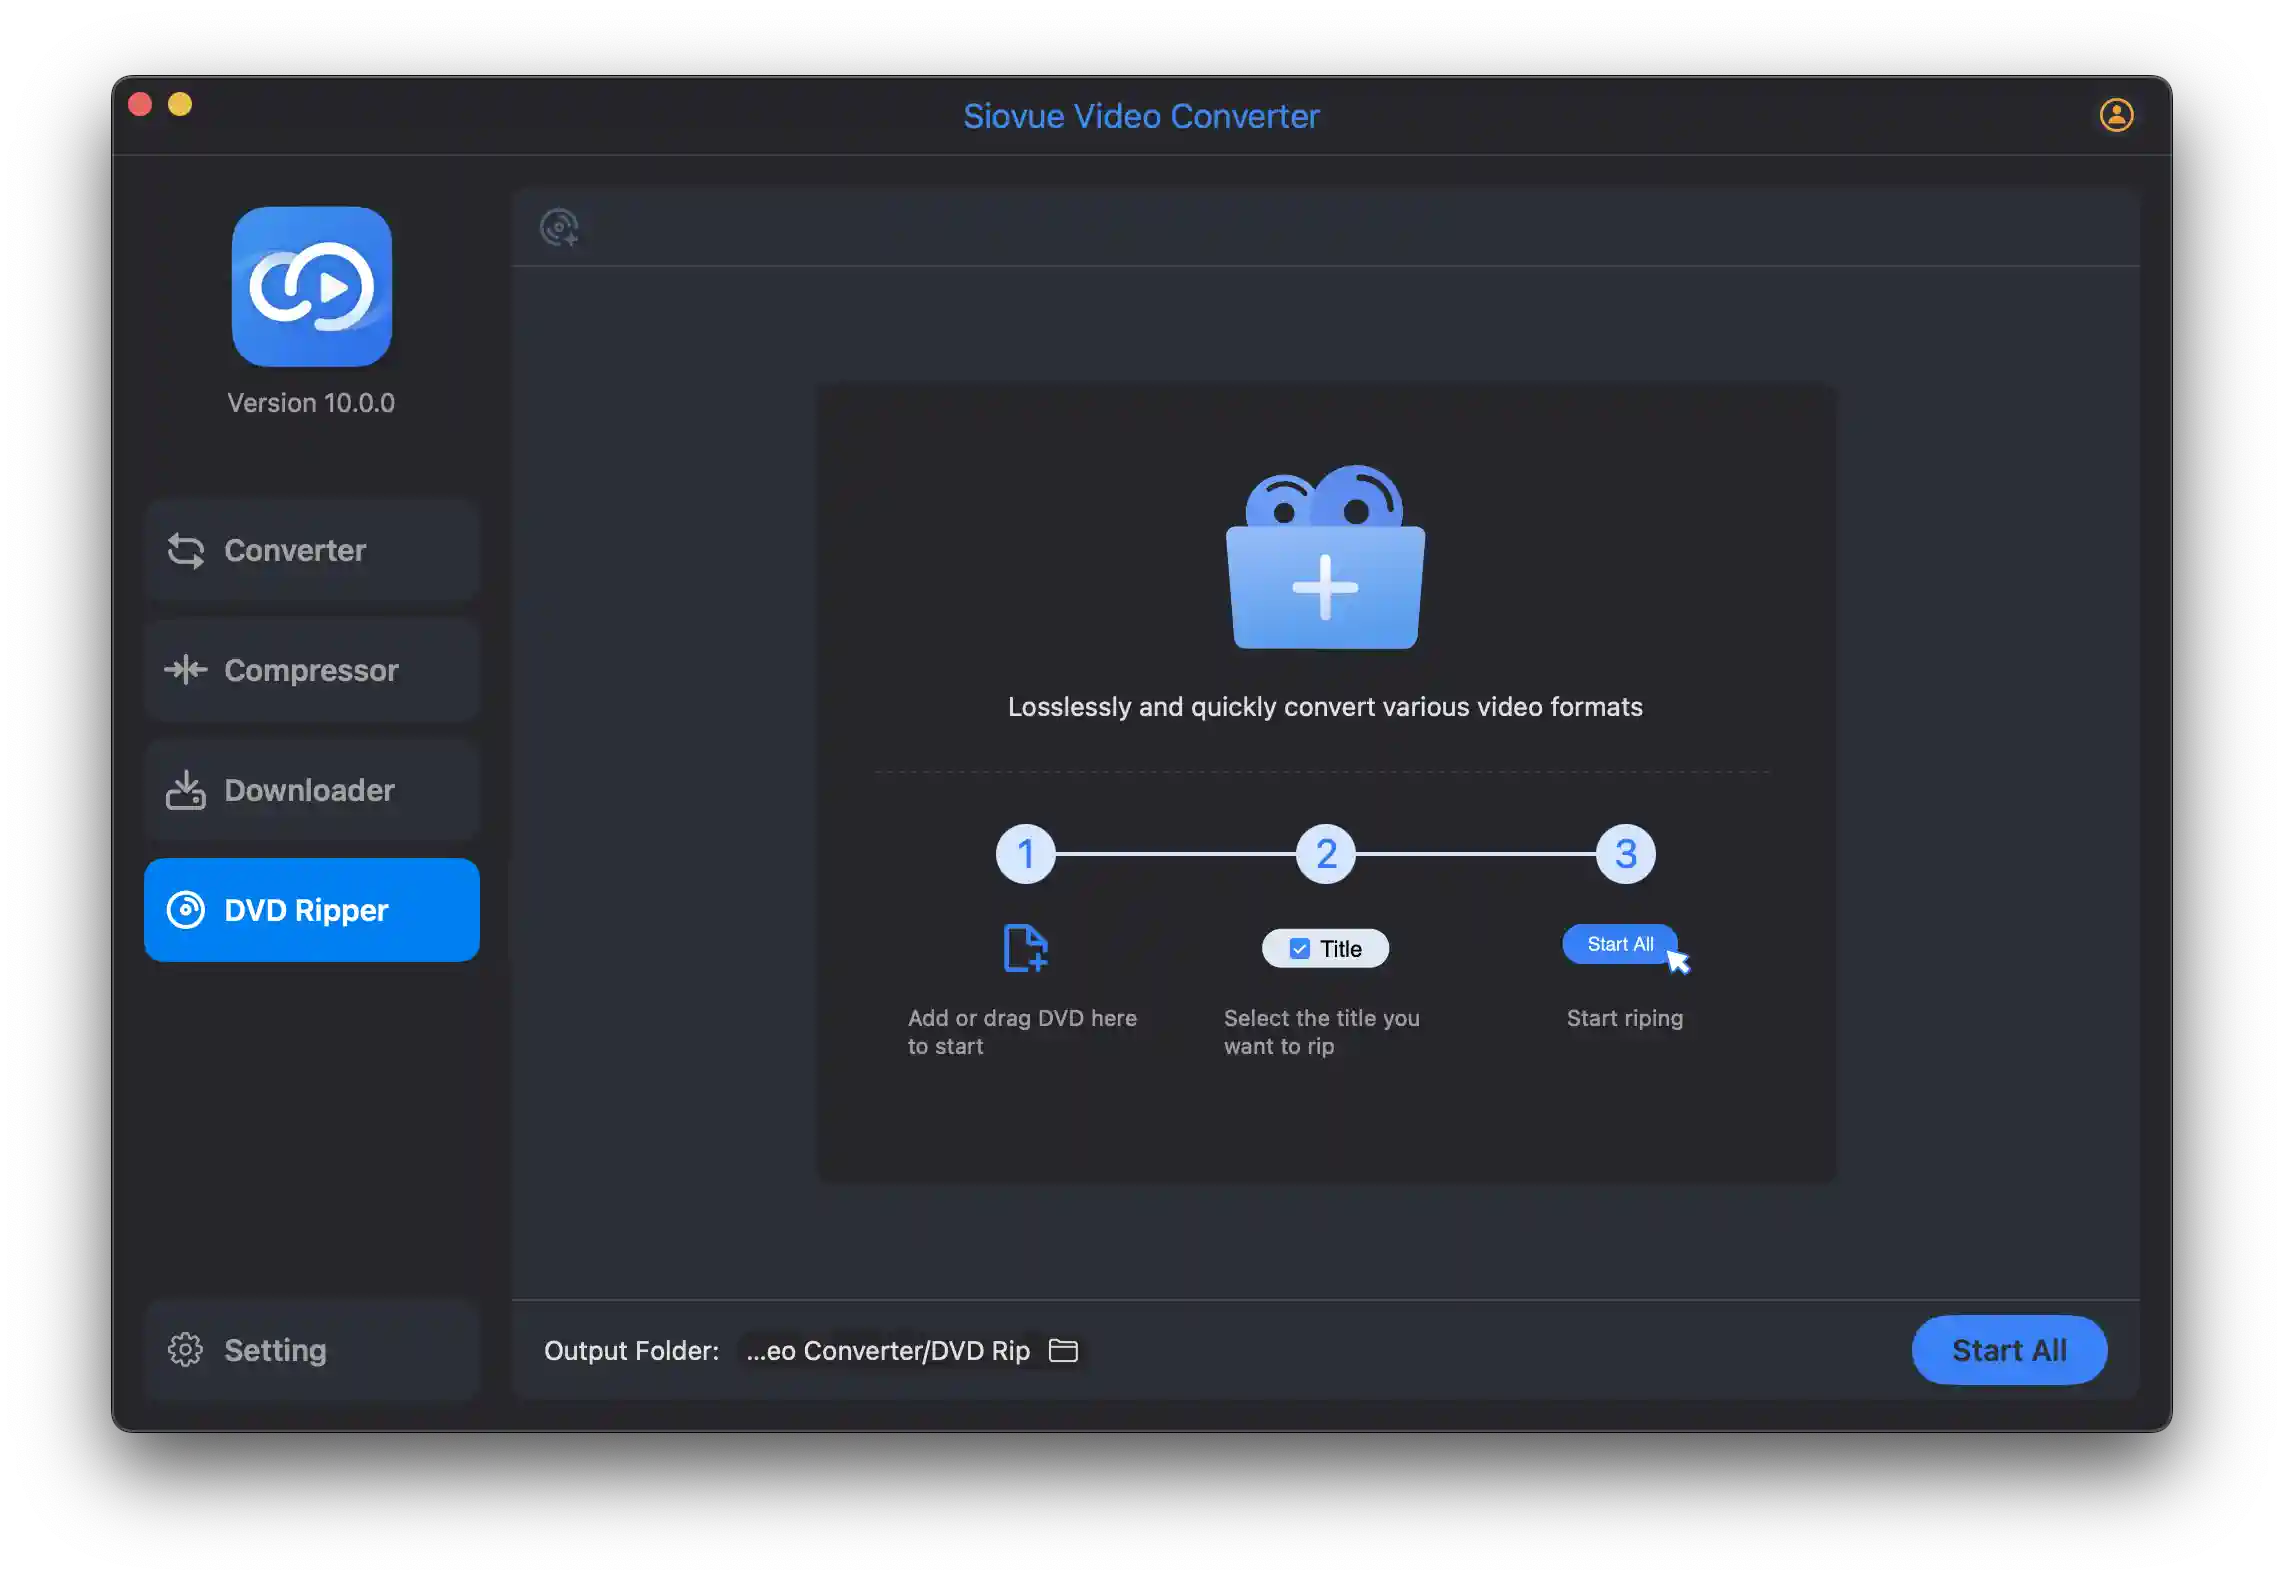
How to Convert DVD to MP4 or Other Formats?
Step 1: Insert the DVD
First, insert the DVD you want to convert into the SuperDrive or another DVD drive. Ensure the DVD drive is working properly and that the DVD content can be read by your Mac.
Step 2: Select the DVD Ripper Feature
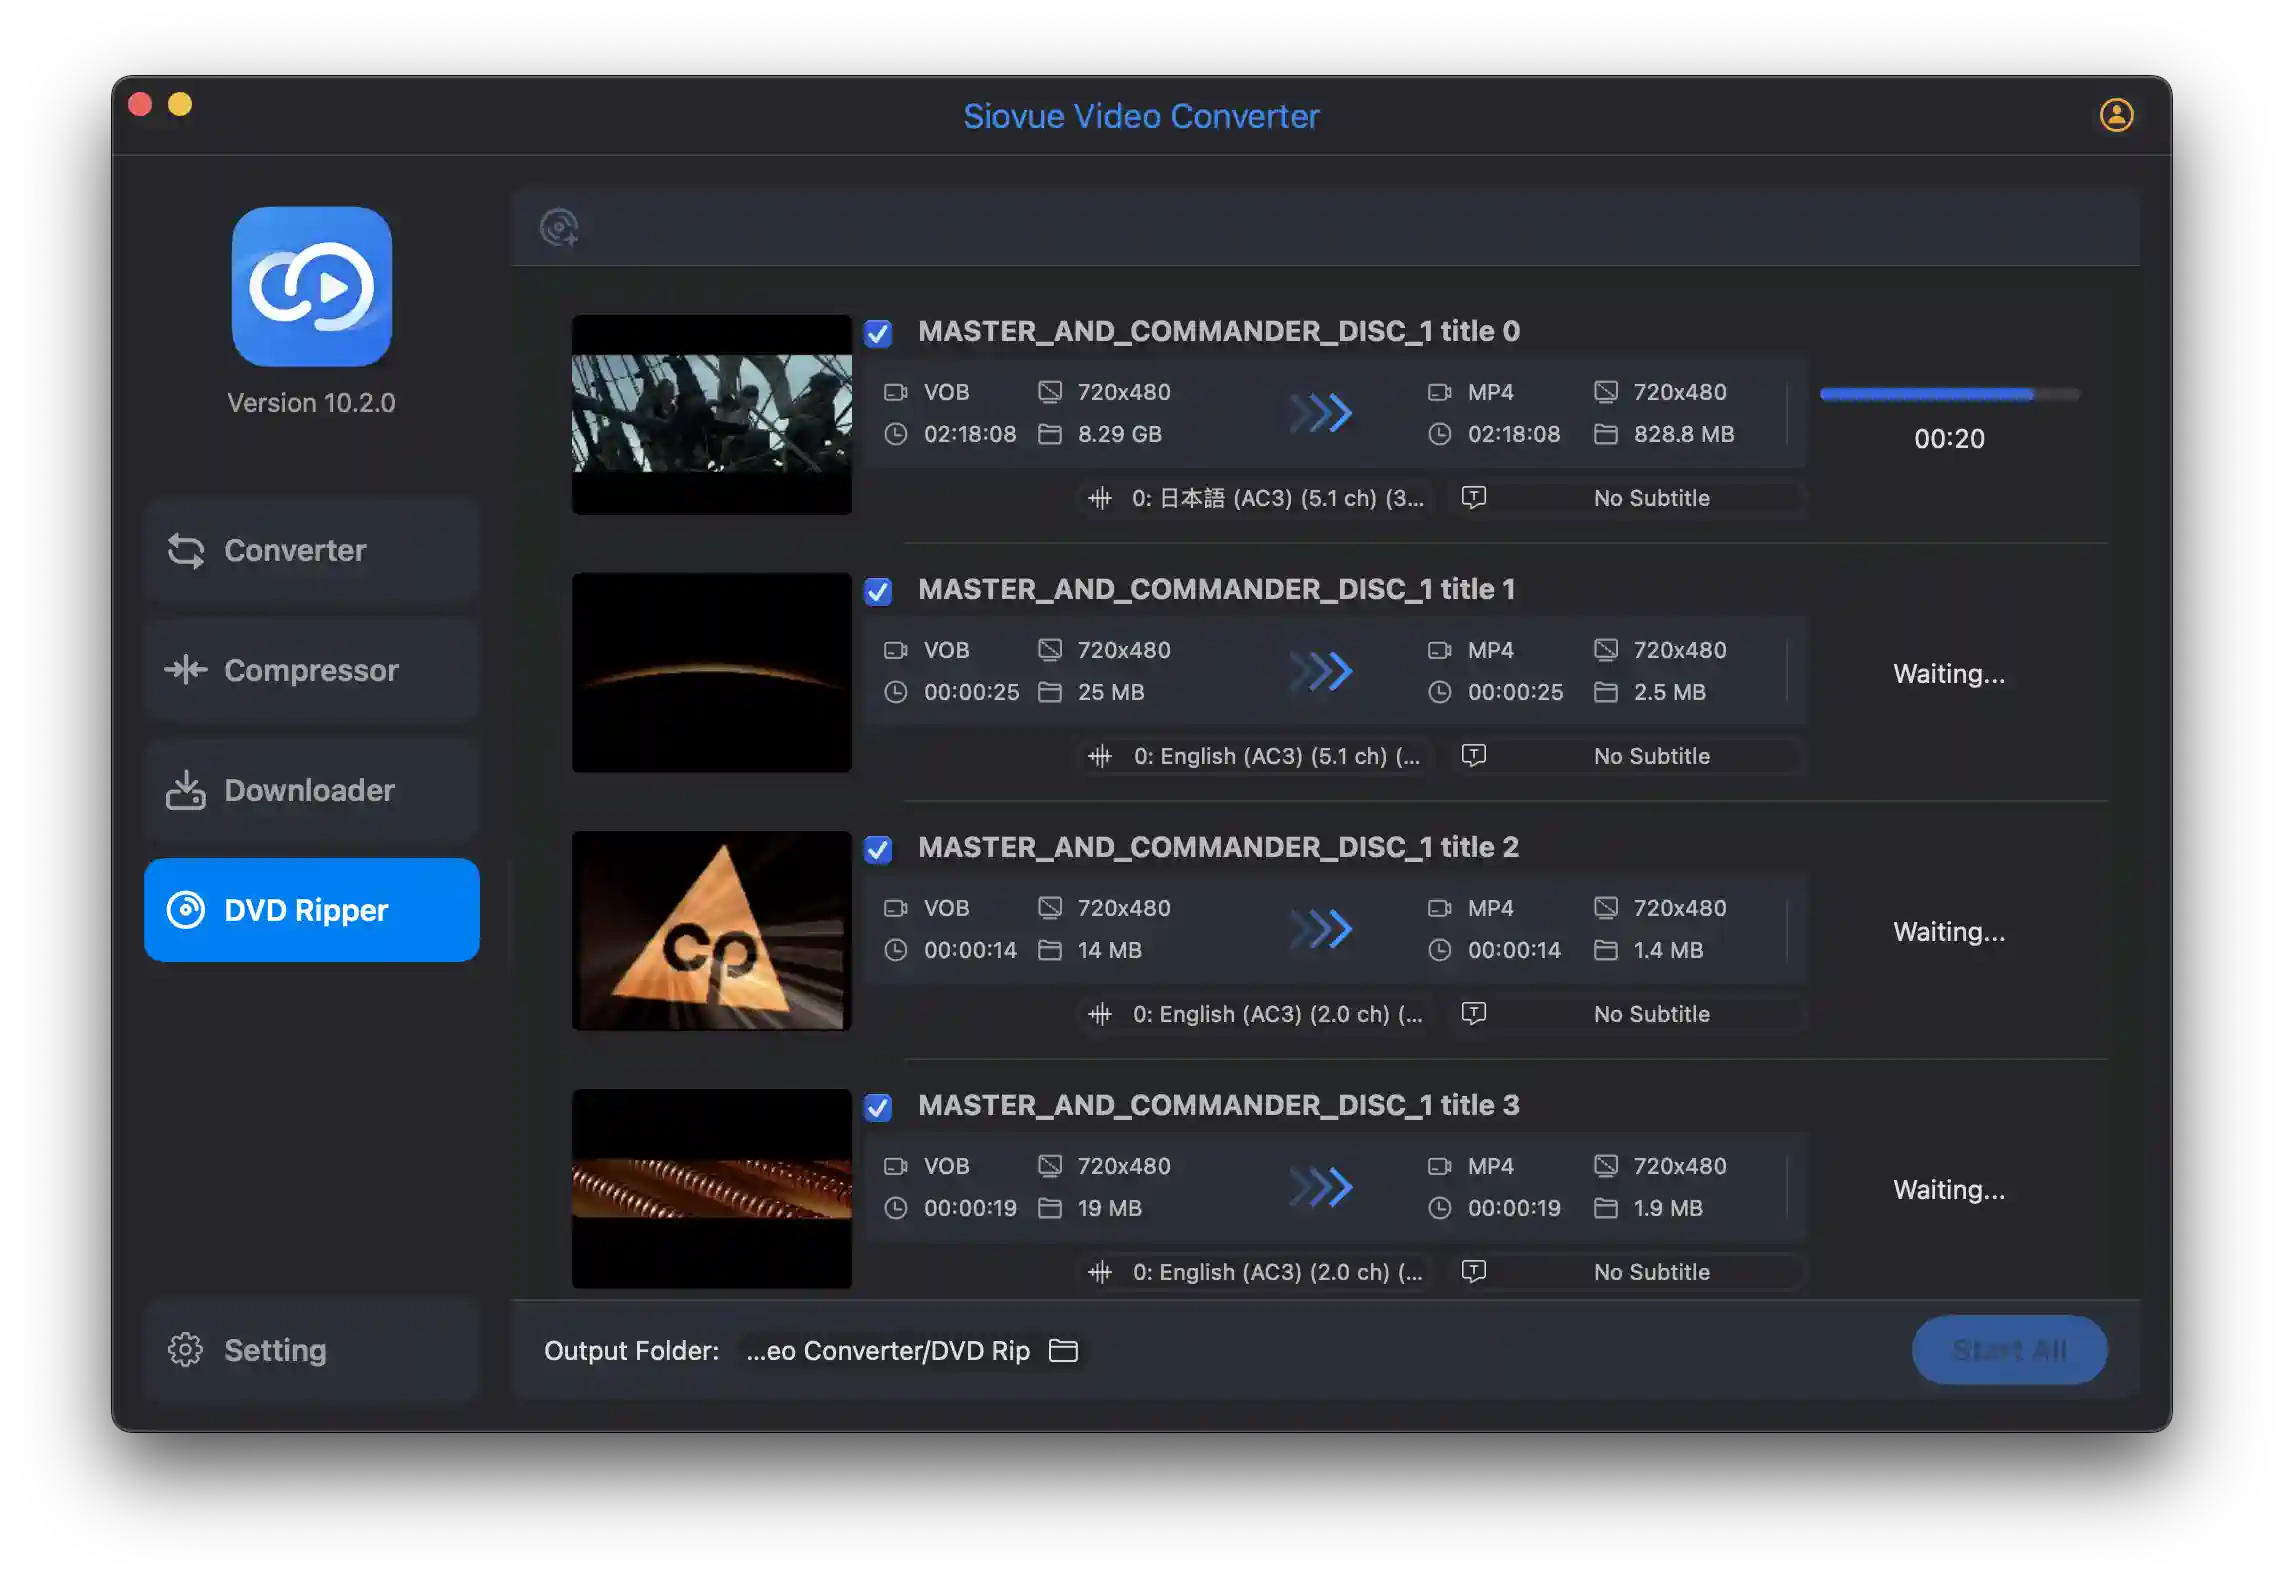
In the left column of the main interface of Siovue Video Converter, select the DVD Ripper option.
Step 3: Import the DVD
- Drag and Drop Import: Drag the DVD icon or the VIDEO_TS folder from the DVD into the DVD Ripper content area.
- Finder Import: Click the
 button to open a Finder window and select the DVD.
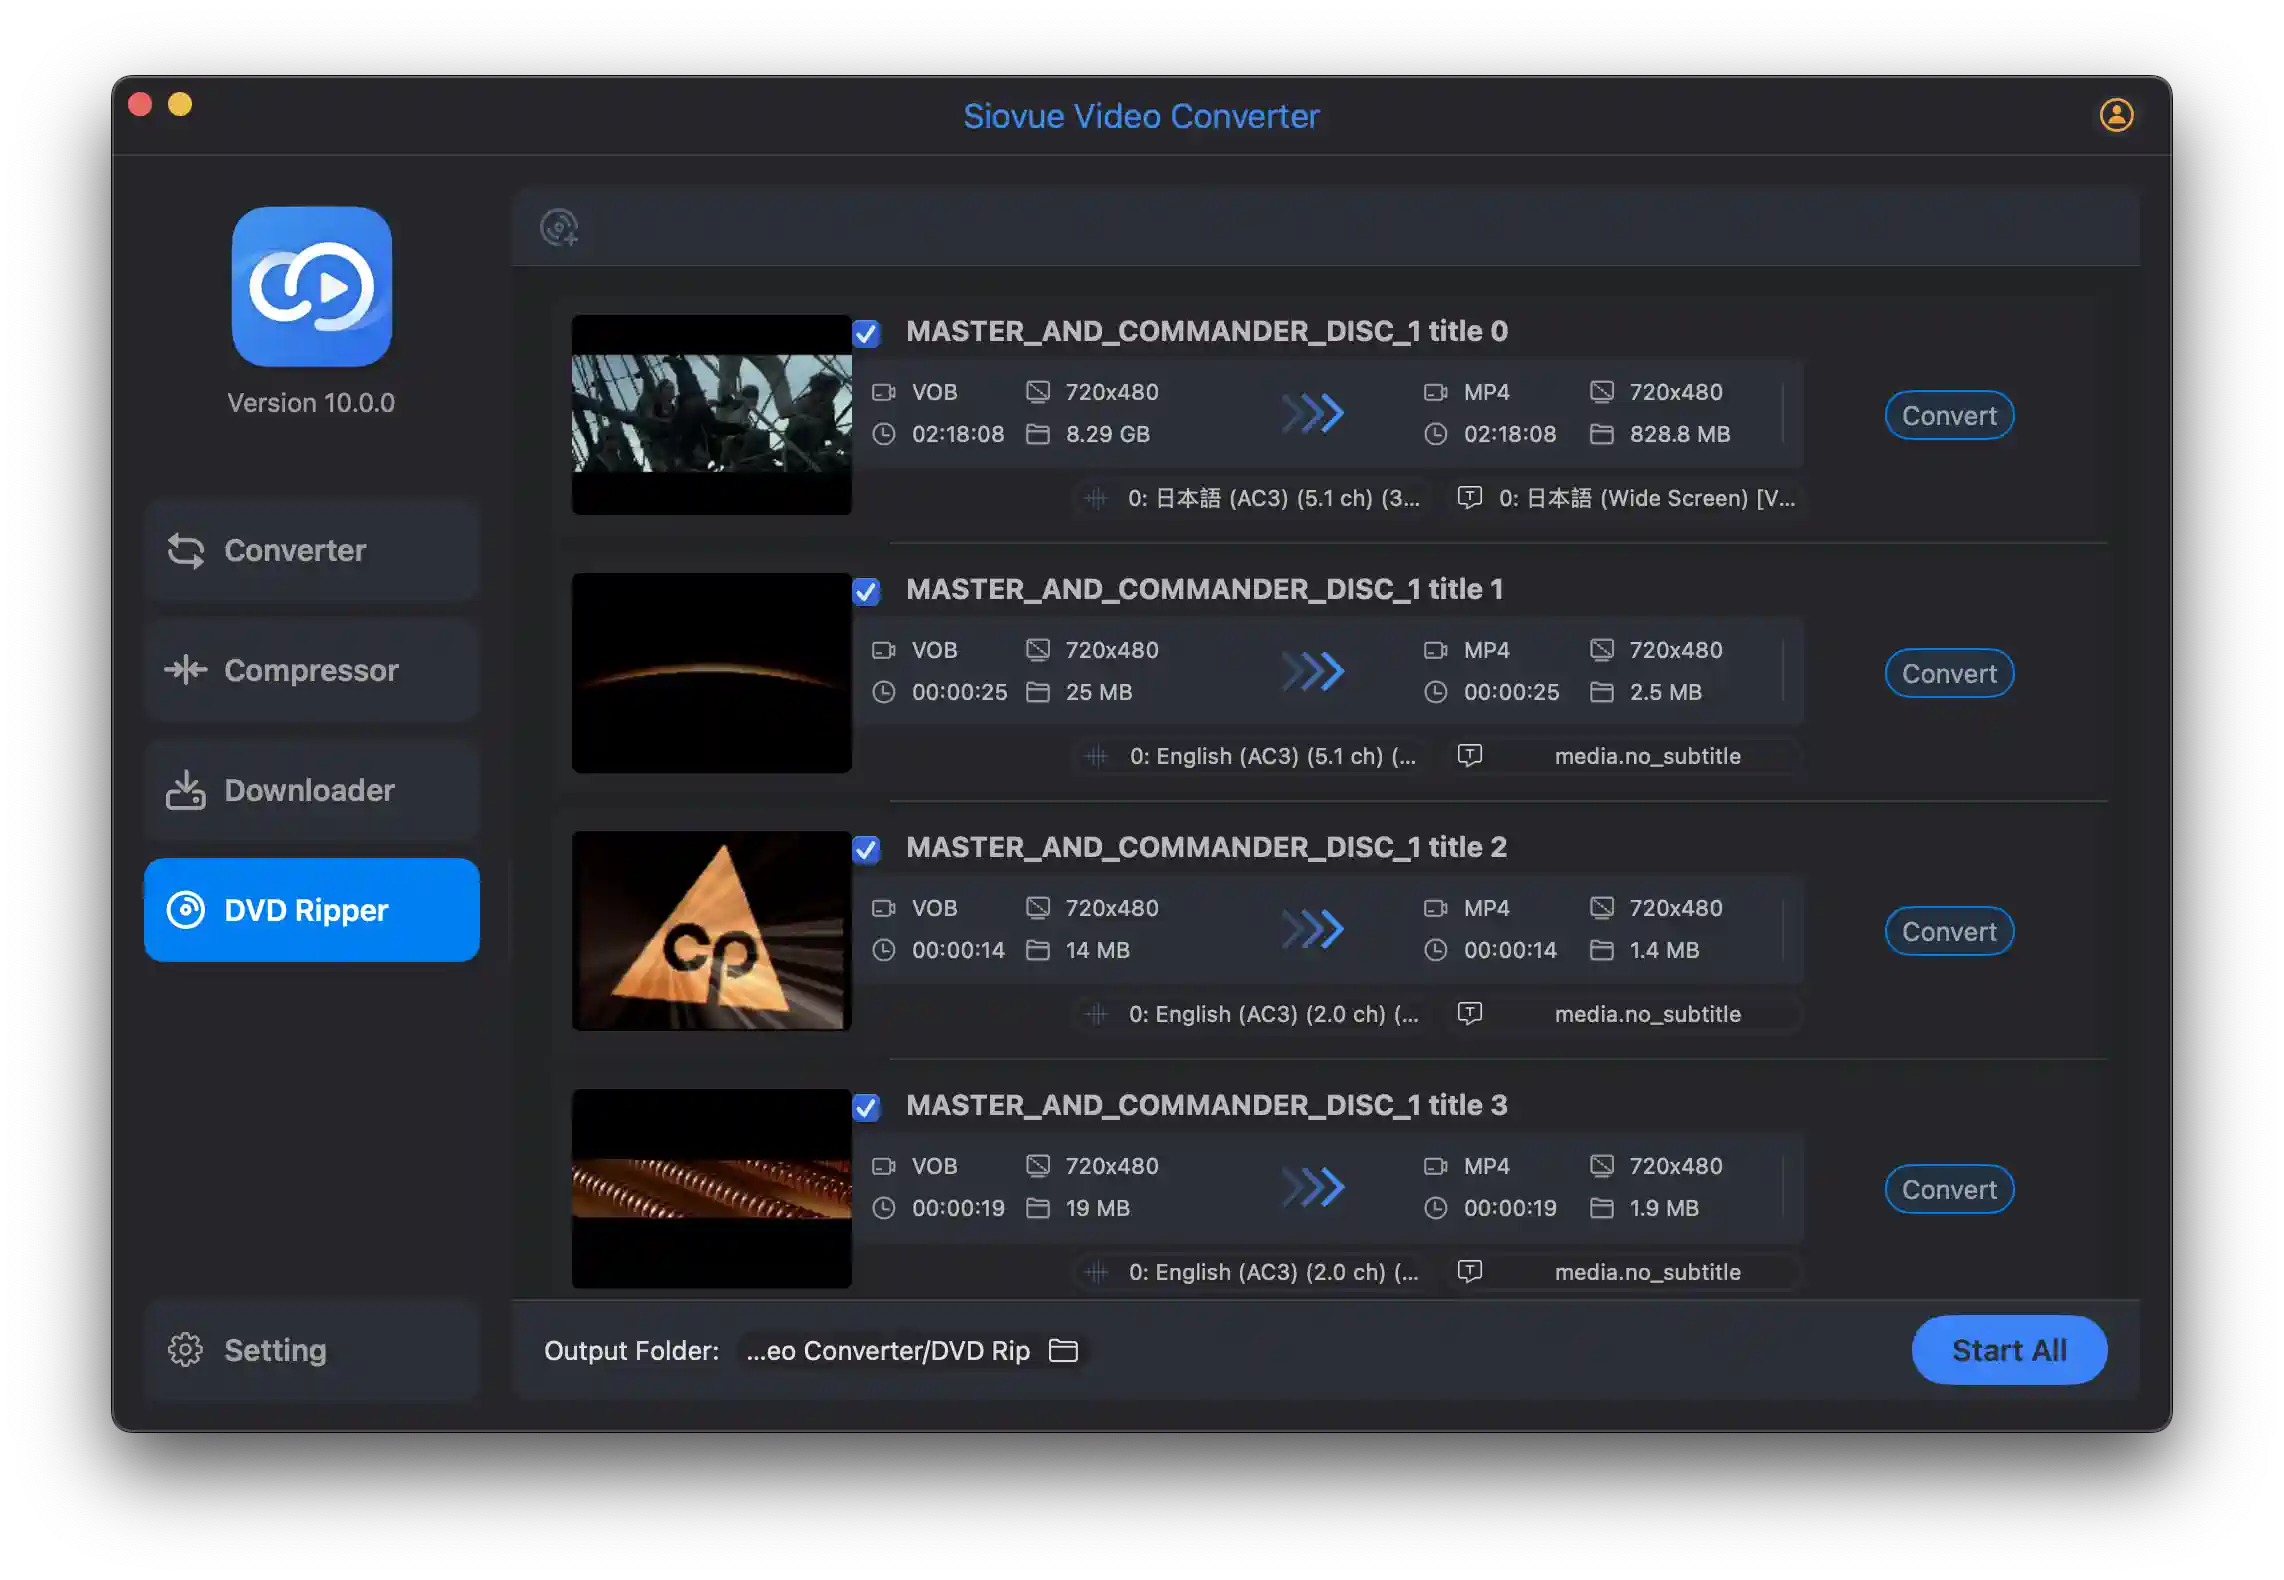
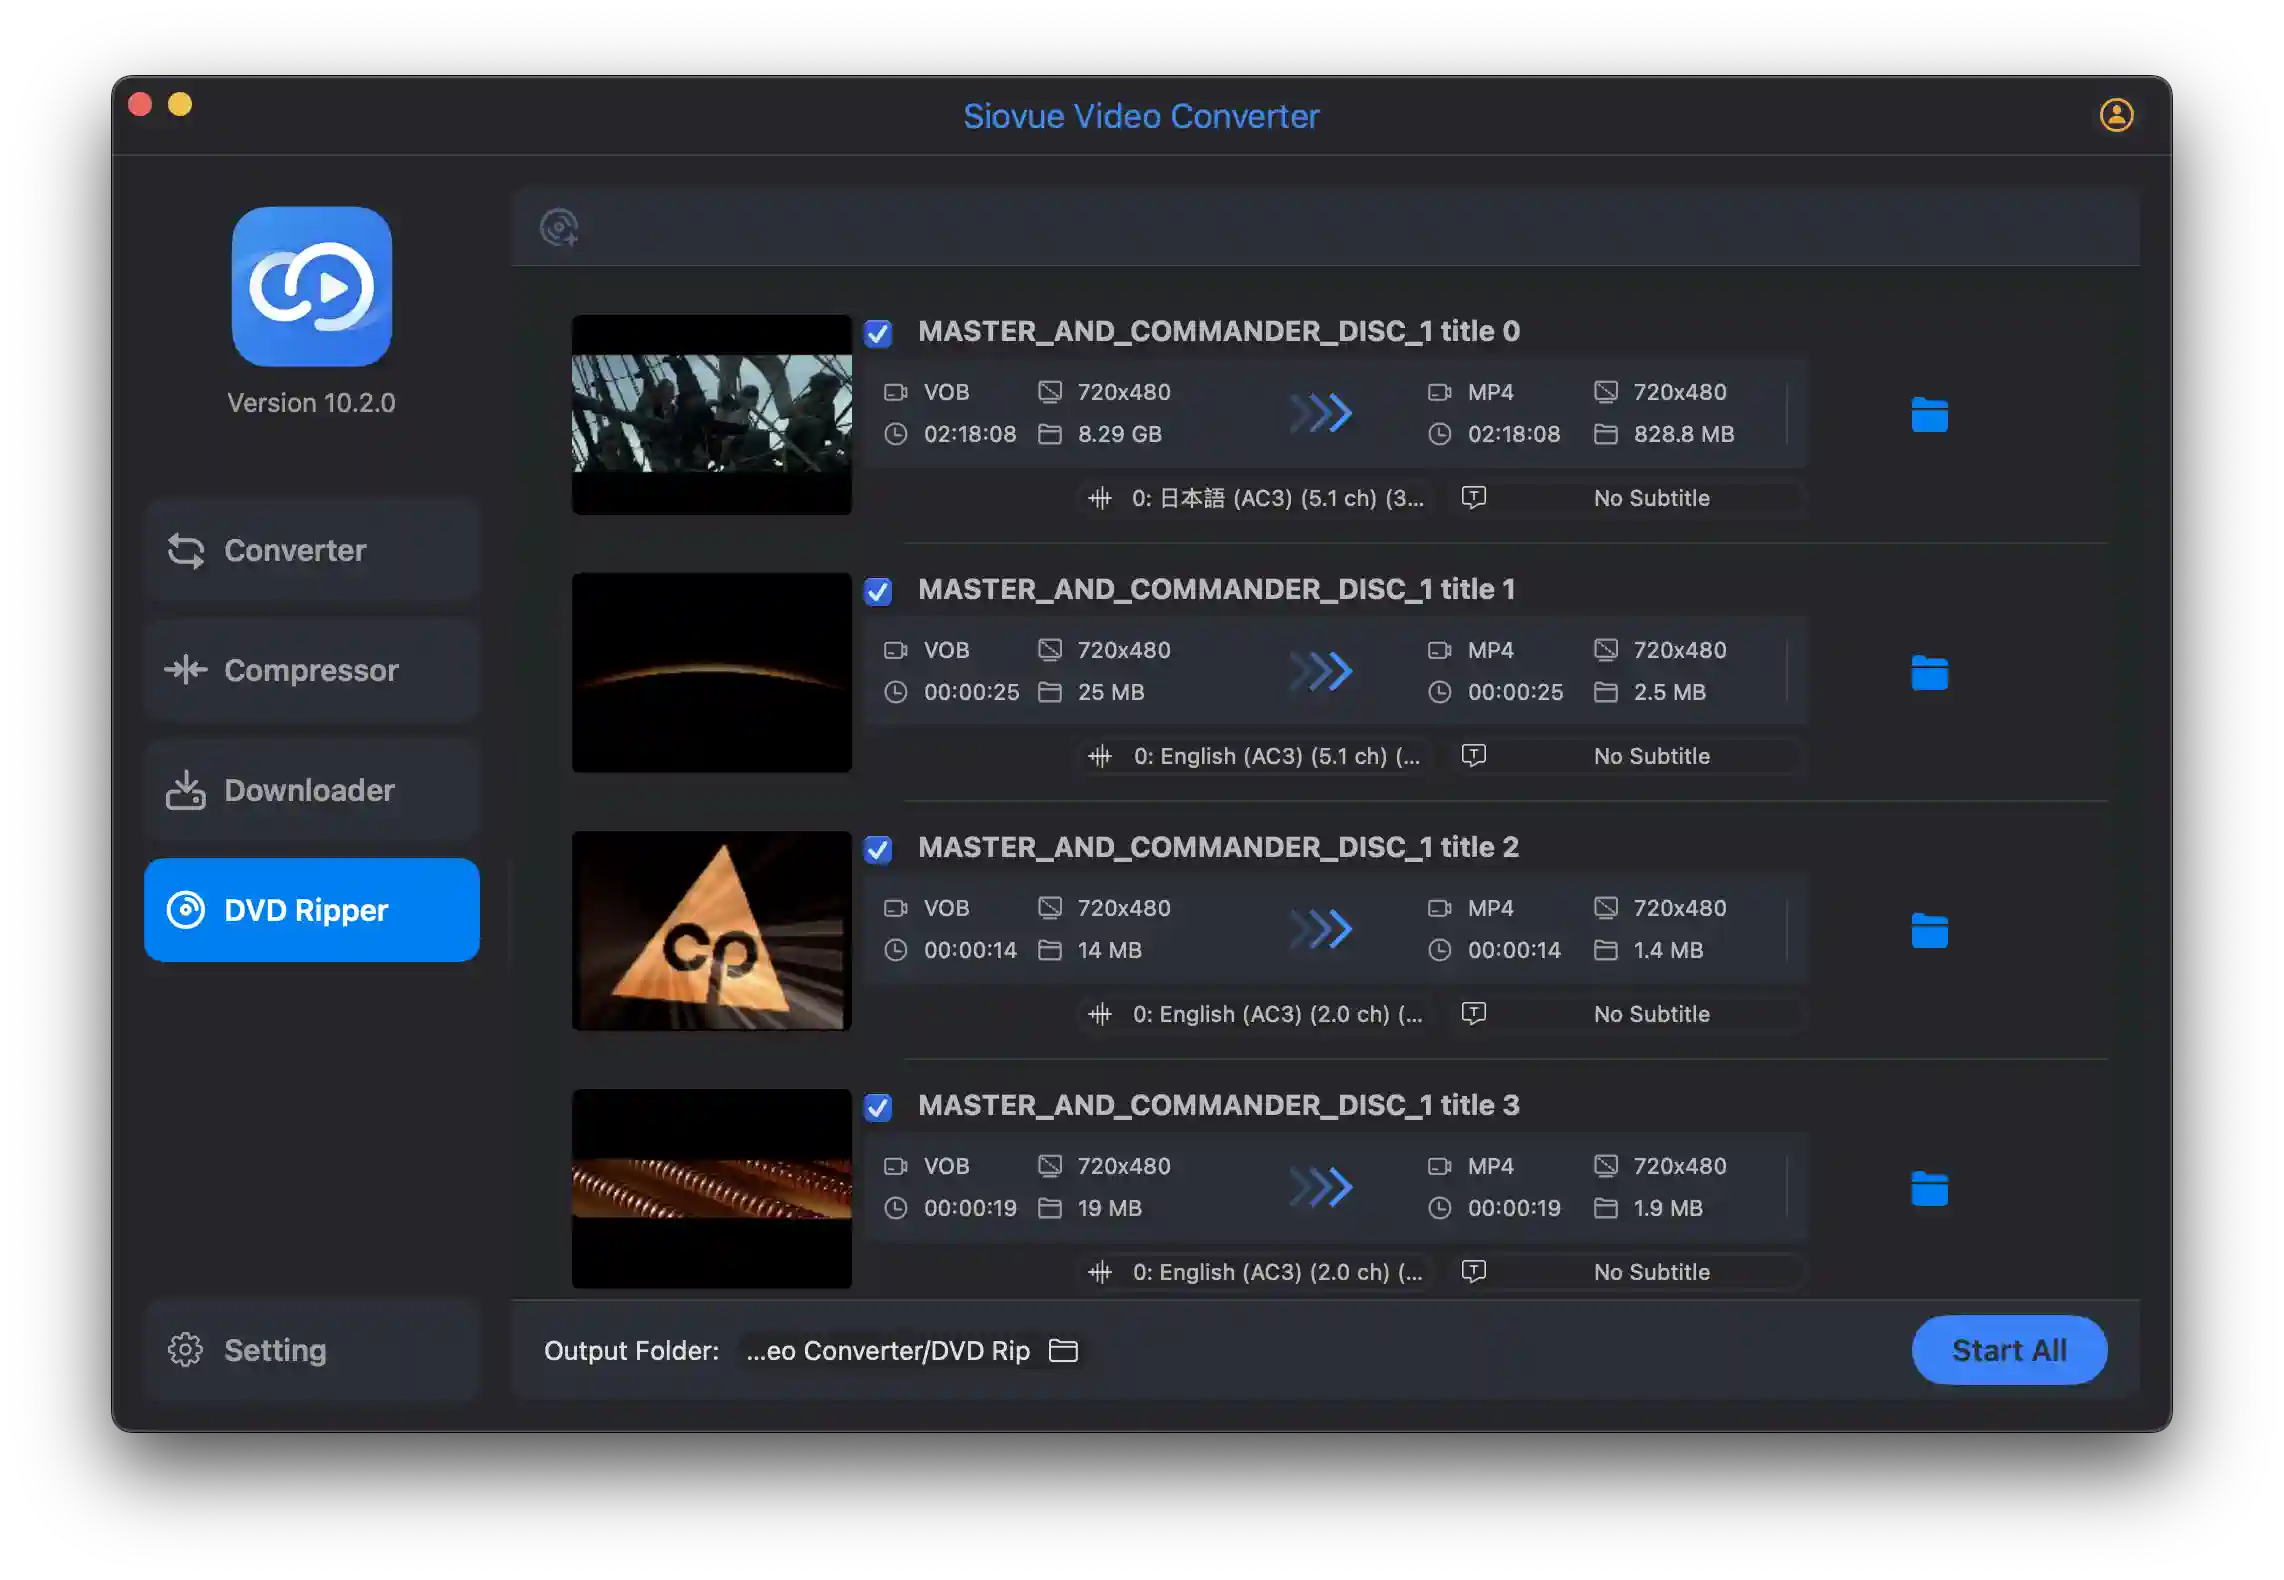
While importing, Siovue Video Converter will display the DVD loading progress. Once loaded, the DVD Ripper content area will display the DVD content, including the Menu and Title. Click the checkboxes to select or deselect Titles. The selected Titles are the ones that will be converted.
Step 4: Set the DVD Ripper Save Directory
Click the  icon at the bottom of the DVD Ripper content area, which will open a
Finder window. In the
Finder window, select a directory and click the Open button. Alternatively, you can select Setting
in the left column of the main interface. In the Setting interface, you can set the save directory
for the DVD Ripper.
icon at the bottom of the DVD Ripper content area, which will open a
Finder window. In the
Finder window, select a directory and click the Open button. Alternatively, you can select Setting
in the left column of the main interface. In the Setting interface, you can set the save directory
for the DVD Ripper.
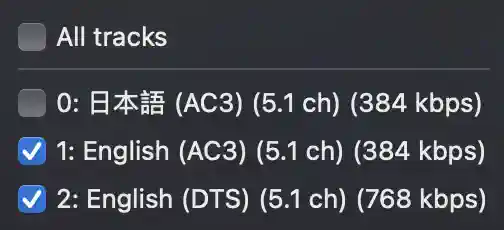
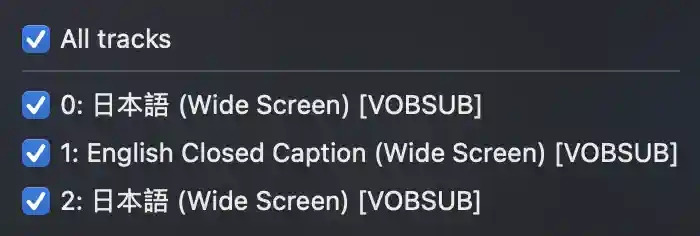
Step 5: Set Audio and Subtitles
Siovue Video Converter will default to retaining all audio and subtitle tracks. You can choose the audio and subtitle streams you need according to your preferences.
- Set Audio: Click the audio selector
 in the Title view you need to set. This will open the audio
selection window. Clicking the "All tracks" option will select all audio streams in the Title.
Clicking each language item will individually select or deselect it. Only the selected items
will be
converted. By default, all audio streams will be selected, usually corresponding to different
languages.
in the Title view you need to set. This will open the audio
selection window. Clicking the "All tracks" option will select all audio streams in the Title.
Clicking each language item will individually select or deselect it. Only the selected items
will be
converted. By default, all audio streams will be selected, usually corresponding to different
languages.
- Set Subtitles: Similar to setting audio, click the subtitle selector
 in the Title view you need to
set. This will open the subtitle selection window. Clicking the "All tracks" option will select
all
subtitle streams in the Title. Clicking each subtitle item will individually select or deselect
it.
Only the selected items will be converted. By default, all subtitles will be selected, usually
corresponding to different languages.
in the Title view you need to
set. This will open the subtitle selection window. Clicking the "All tracks" option will select
all
subtitle streams in the Title. Clicking each subtitle item will individually select or deselect
it.
Only the selected items will be converted. By default, all subtitles will be selected, usually
corresponding to different languages.
Step 6: Start Conversion
After setting the conversion format and output options, click the Start Conversion button. The software will begin converting the DVD content into your chosen format. The conversion time may vary depending on the amount of DVD content and your computer’s performance. Please be patient while the conversion completes.
Step 7: View the Converted Files
You can click the ![]() button to display the converted files in Finder.
button to display the converted files in Finder.
Note: When using the DVD Ripper feature, ensure you have the right to convert and use the DVD content. Comply with relevant laws, regulations, and copyright requirements, and respect others' intellectual property rights.
Part 6: Setting
The Setting interface contains some general settings.
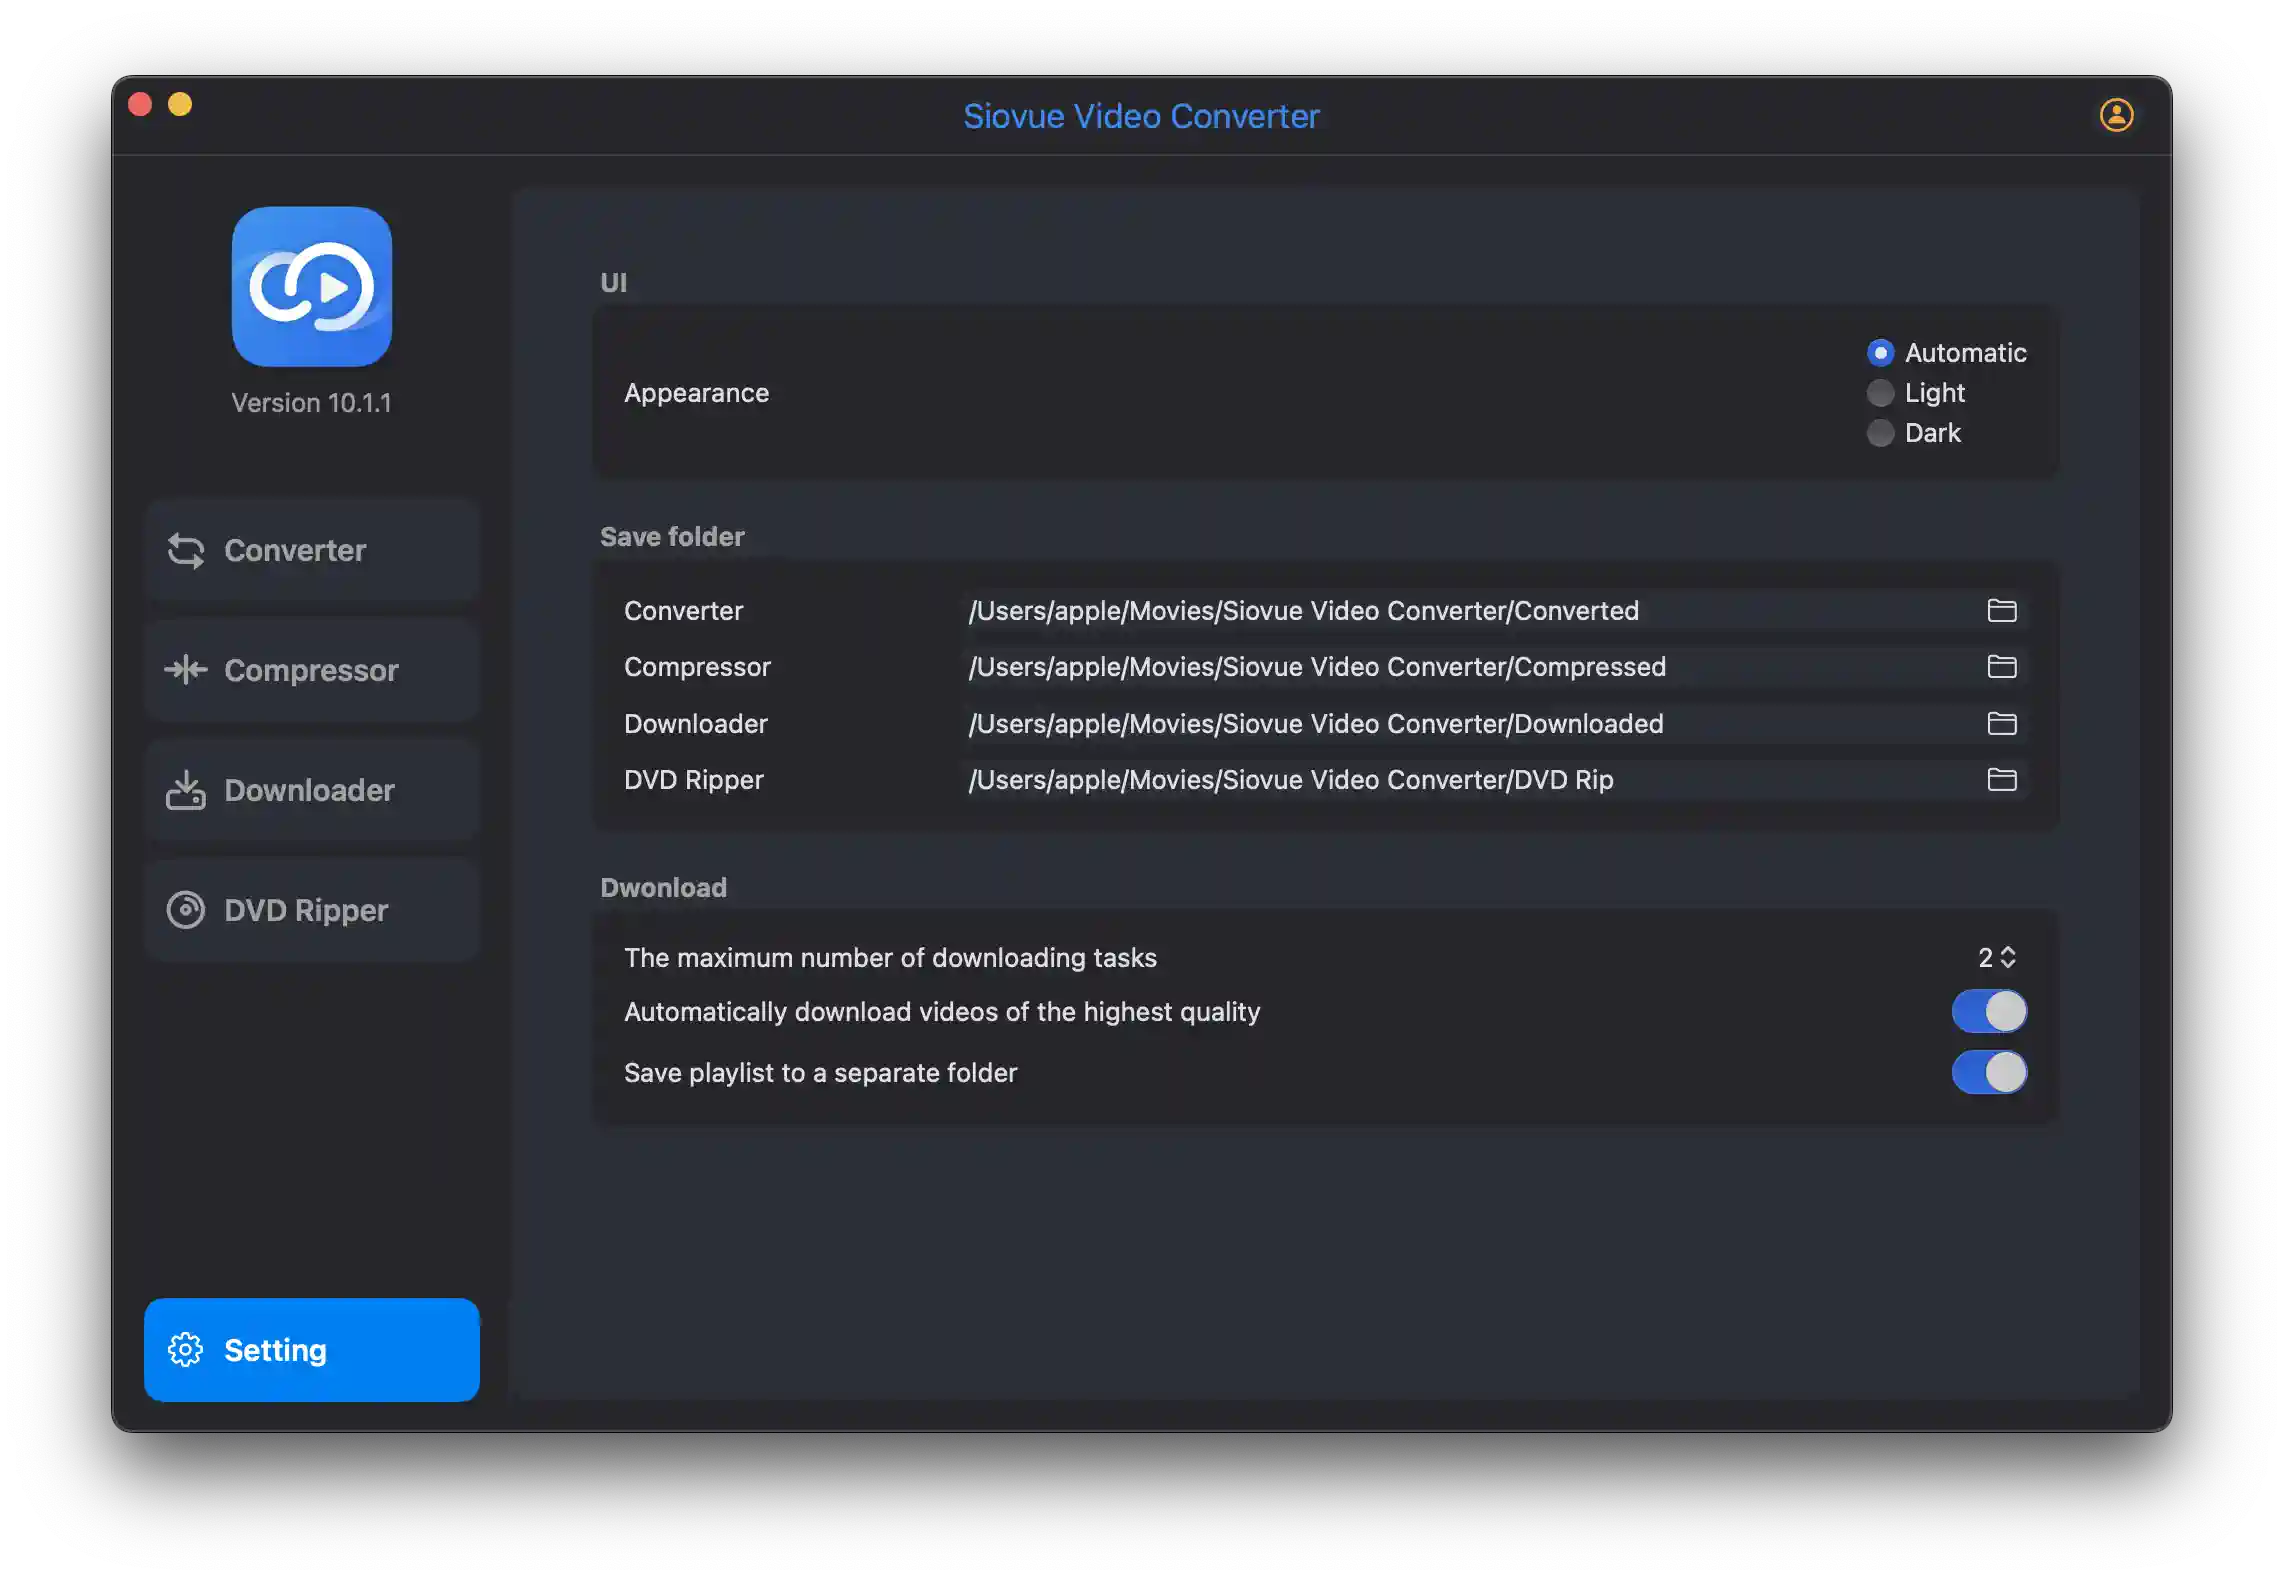
UI
Appearance:
- Automatic: Follow the system settings.
- Light: Light mode.
- Dark: Dark mode.
Save Folder
- Converter: Set the save directory for Converter audio and video files.
- Compressor: Set the save directory for Compressor video files.
- Downloader: Set the save directory for Downloader audio and video files.
- DVD Ripper: Set the save directory for DVD conversion files.
Download
- The maximum number of downloading tasks: Set the number of videos to download simultaneously, ranging from 1 to 5.
- Automatically download videos of the highest quality: Whether to automatically download the highest quality format. This is turned on by default.
- Save playlist to a separate folder: Whether to create a folder for playlists, saving videos from the playlist in a separate folder. This is turned on by default.
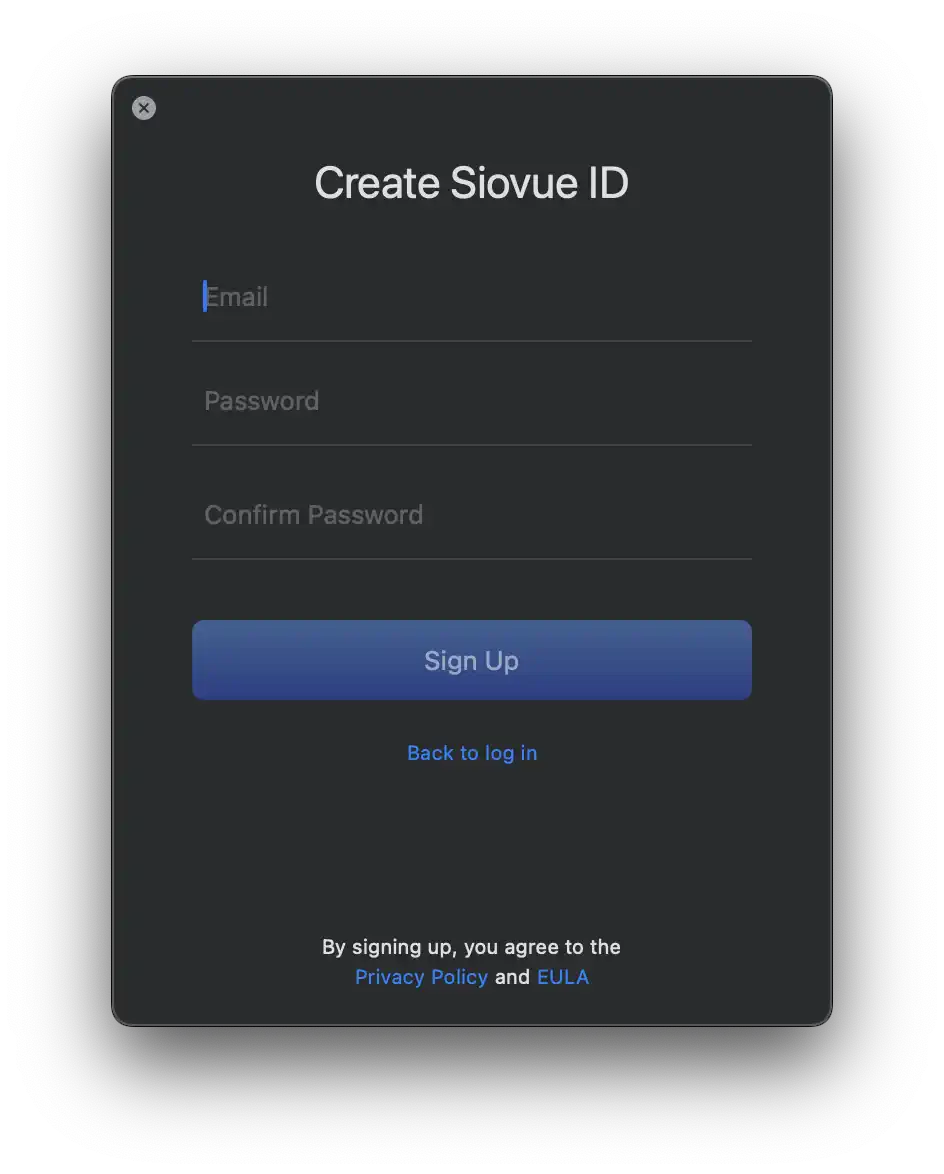
Part 7: Registering a Siovue ID
You need to have a Siovue ID, which is used to help you activate the product, provide better customer support, and offer more discounts on purchasing other Siovue products.
Already have a Siovue ID:
Click the button in the upper right corner of the main interface. This will bring up the Login window. Enter your email and password, then click the Login button.
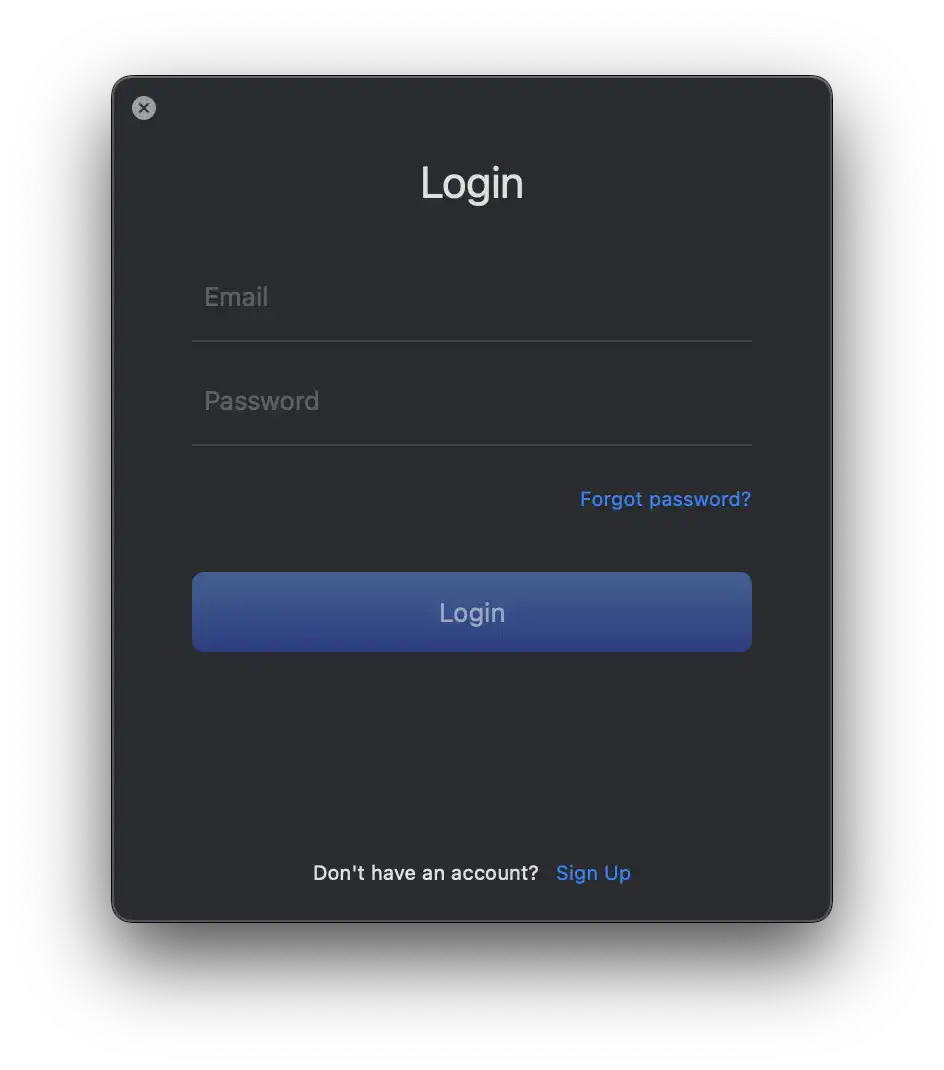
Do not have a Siovue ID:
Click the Sign Up button at the bottom of the Login interface. This will switch to the Create Siovue ID interface, where you can register. By registering for a Siovue ID, you agree that you have read and accepted the privacy policy and end-user license agreement.